Book art DIY projects turn forgotten pages into decor you’ll actually want to display. If you love reading, collecting vintage finds, or crafting on a budget, book-based projects are perfect. You can make wall art, gifts, party decor, and cozy shelf pieces with supplies you already have. This list shares 27 creative book art DIY ideas with simple steps, low-cost materials, and realistic results that look special without demanding expert skills.
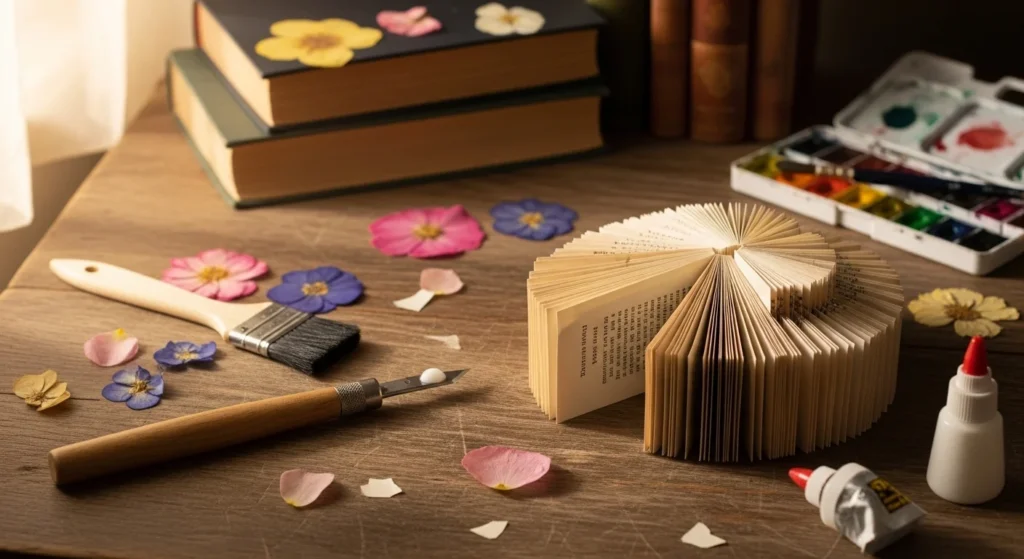
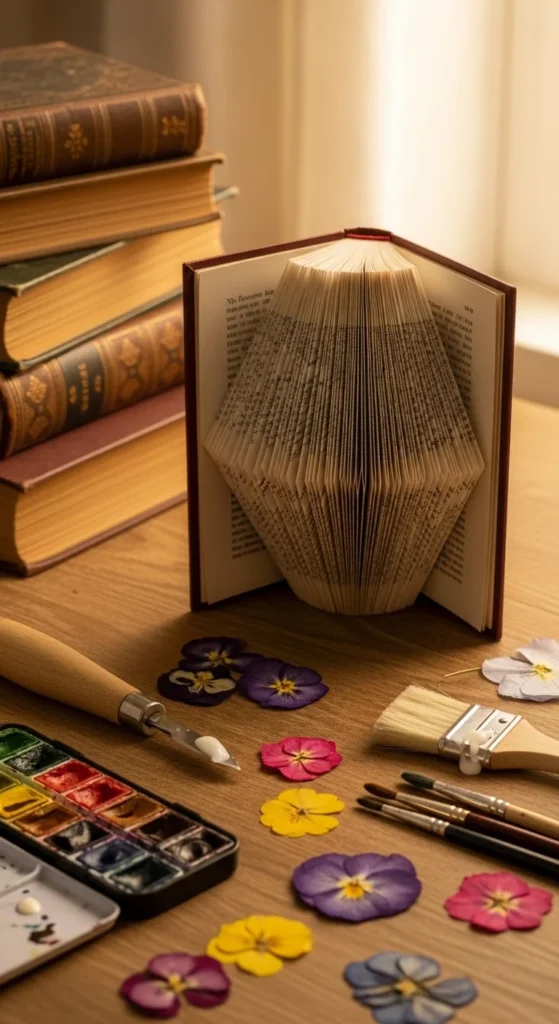
1. Folded Book Heart Sculpture
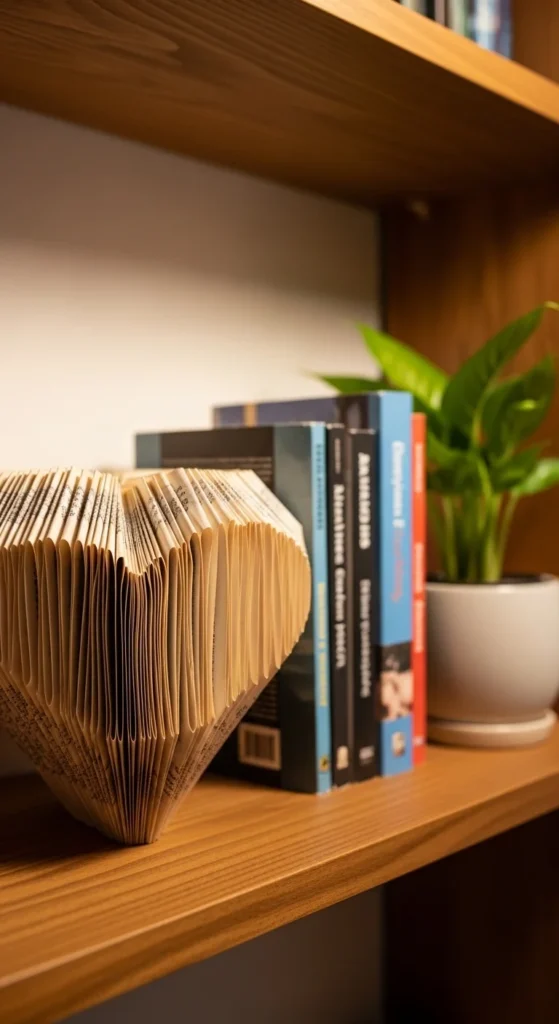
Folded book art looks impressive, yet the method is simple once you get a rhythm. Choose a thick paperback you don’t mind repurposing. Lightly mark a heart outline on the page edges using a printable template or a quick hand sketch.
Fold each page inward to match your outline. Work slowly and keep folds crisp. After 20–30 pages, the shape becomes clear. Keep going until the heart looks full.
For a cleaner finish, tuck uneven edges and press the book under a stack of heavy books overnight.
Budget tip: Use thrift-store paperbacks. Pick one with lots of pages so the shape looks bold.
Want a personal touch? Use a book from a genre she loves, or one with a worn cover for a vintage look. Display it on a mantle, bookshelf, or desk.
2. Secret Hollow Book Storage Box
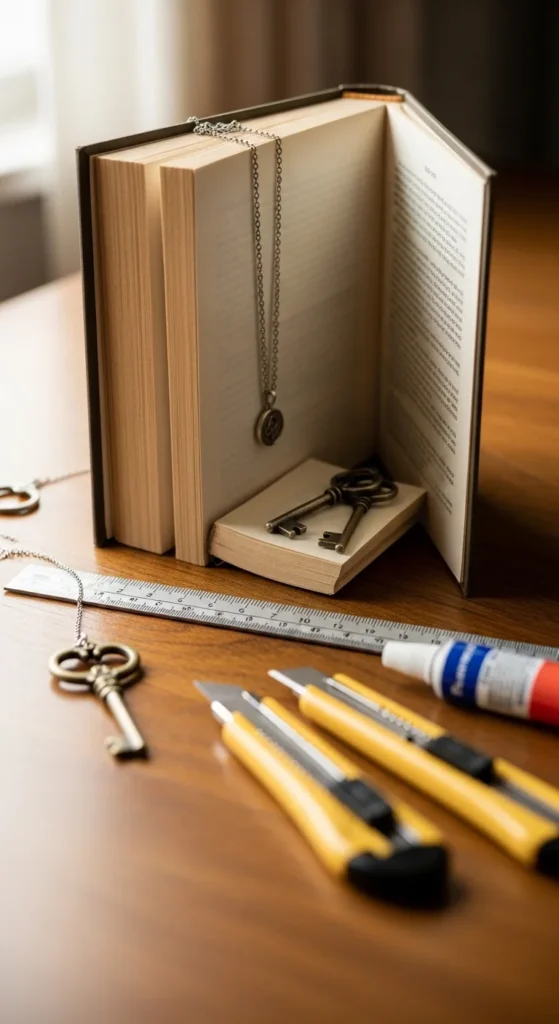
A hollow book box is practical and fun. Pick a hardcover with a solid spine. Open it and trace a rectangle inside, leaving a thick border around the edges.
Cut through pages with a craft knife, working in small sections. Glue the remaining border pages together so the walls stay firm. Line the inside with fabric, scrapbook paper, or kraft paper for a tidy finish.
Let everything dry under weight so the book stays flat.
Budget tip: Use school glue and a cheap paintbrush. Both work fine for sealing pages.
This project hides jewelry, notes, cords, or keepsakes. It also looks normal on a shelf, which makes it a great gift for readers who like tidy spaces.
3. Book Page Fan Centerpiece

This centerpiece works well for book-themed parties and shelf styling. Use a paperback and fold pages into even accordion folds. Start small and keep spacing consistent.
Once several pages are folded, gently spread them into a fan. Secure the first and last folded pages together with glue or a small binder clip hidden at the base.
Add a ribbon around the spine or tuck in dried flowers for a soft touch.
Budget tip: Skip ribbons and use twine or scrap yarn.
Fans look great in pairs. Make two and set them on either side of a tray, candle, or small vase. Keep it simple and let the paper texture do the work.
4. Book Page Roses in a Mini Vase
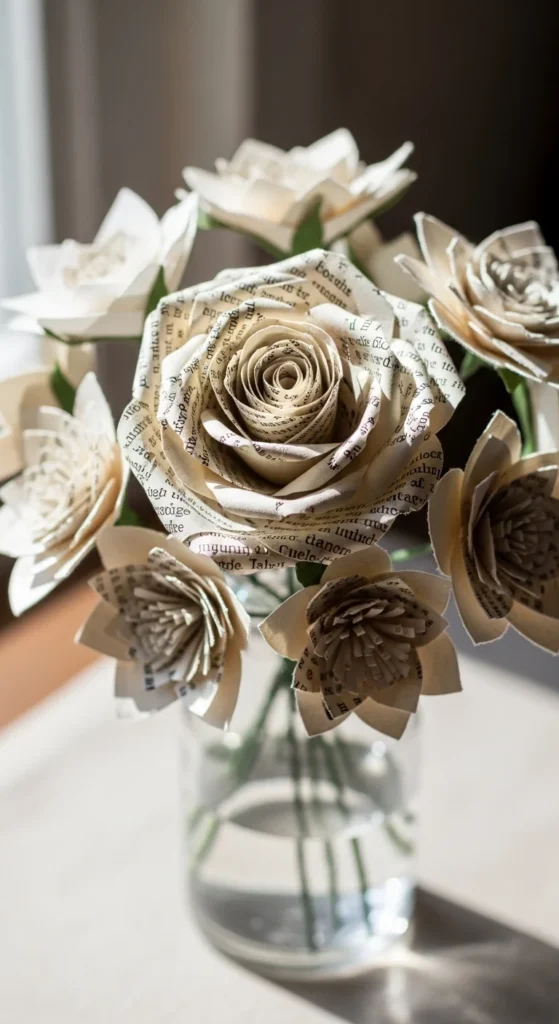
Paper roses look romantic and make great gifts. Tear or cut book pages into petal shapes. Start with a tight center roll, then wrap larger petals around it, gluing as you go.
Use floral wire or wooden skewers for stems. Wrap stems with brown floral tape or even masking tape painted brown.
Place three to five roses in a small vase. Add a few green paper leaves for contrast.
Budget tip: Use pages from damaged paperbacks. You don’t need perfect paper.
If you want a softer look, lightly brush the petal edges with diluted watercolor. Keep color subtle so the print still shows through.
5. Rolled Page Wreath for a Door or Wall

A page wreath adds instant bookish charm. Cut book pages into squares. Roll each square into a cone and glue the edge. Repeat until you have a big pile of cones.
Use a cardboard ring as your base. Glue cones around the ring, overlapping slightly. Add a second layer for fullness.
Finish with twine for hanging. Keep it neutral and simple.
Budget tip: Cardboard from packaging works as the wreath base.
This is a great way to use many pages fast. It also looks good year-round, especially in reading corners, home offices, or classrooms.
6. Layered Book Page Shadowbox Art
Shadowbox page art looks detailed but is doable with patience. Choose several pages with similar tone. Stack them and cut a simple shape in the center of each page, like a circle, mountain line, or oval.
Each layer should be slightly smaller than the one behind it. When stacked, you get a tunnel effect. Glue layers inside a shadowbox frame.
Add a sheet of colored paper at the back for a soft background.
Budget tip: Use a thrift-store frame and paint it.
Keep shapes simple. Clean cuts matter more than fancy designs. This project works well as wall decor or a handmade gift for book lovers.
7. Book Page Butterfly Garland
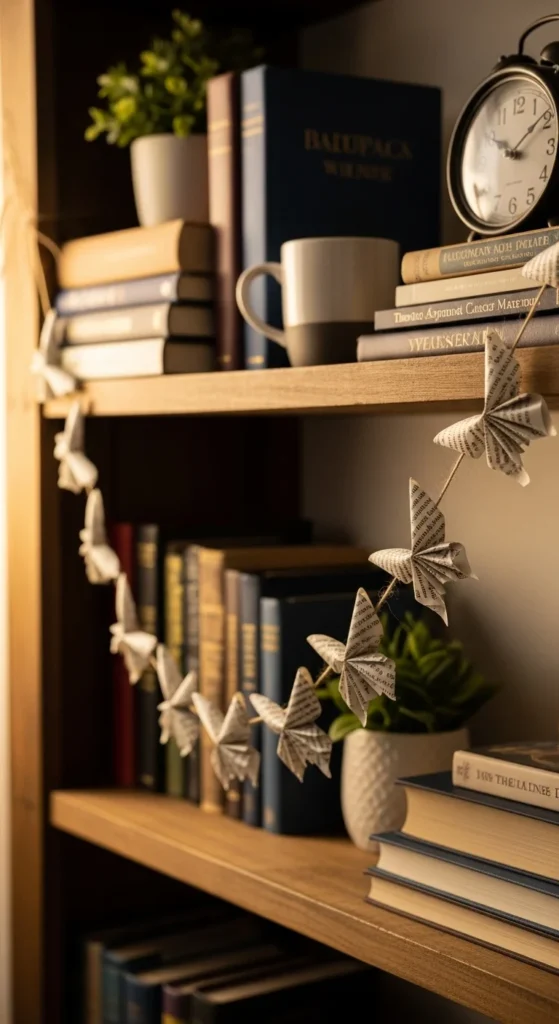
This garland is quick and looks great for parties or shelf styling. Cut butterfly shapes from pages using a template. Fold each butterfly slightly in the center to give it dimension.
Clip or glue butterflies to twine. Space them evenly.
Hang across a bookshelf, mirror, or window.
Budget tip: Use leftover string, yarn, or jute.
For extra depth, layer two butterfly shapes and glue only the center. That gives a raised wing effect without extra effort.
8. Silhouette Cutout Page Art

Silhouette art feels classic and personal. Print a simple profile silhouette and use it as a cutting guide. Cut the silhouette from black paper.
Mount it on a book page with interesting text. Add a second page behind it for contrast, then frame it.
This works well with old novels, poetry books, or dictionaries.
Budget tip: Use cardstock from packaging for the silhouette.
Keep framing minimal. A thin black or wood frame looks clean. This is a strong gift idea for moms, teachers, or friends who love literature.
9. Miniature Handmade Books
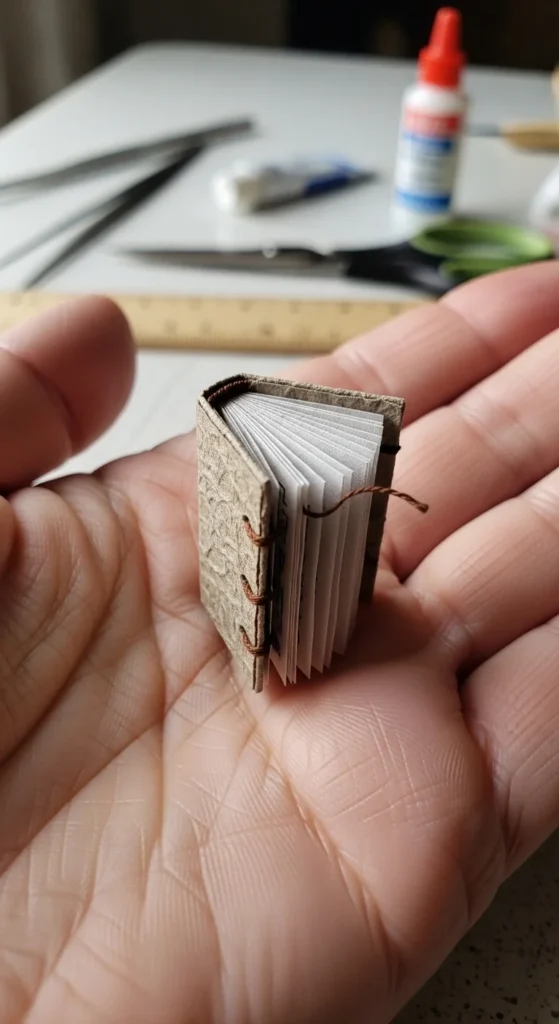
Mini books are fun for gifts and decor. Cut small rectangles from paper. Fold into signatures and stack them. Stitch the spine with a simple pamphlet stitch using needle and thread.
Create a cover with thicker paper or thin cardboard. Wrap it with decorative paper or a recycled book page.
Make a set of three and tie them with twine.
Budget tip: Use scrap paper and thread you already have.
Mini books look great as ornaments, dollhouse accessories, or shelf decor. They also pair well with a handmade bookmark.
10. Pressed Flower Book Page Bookmark
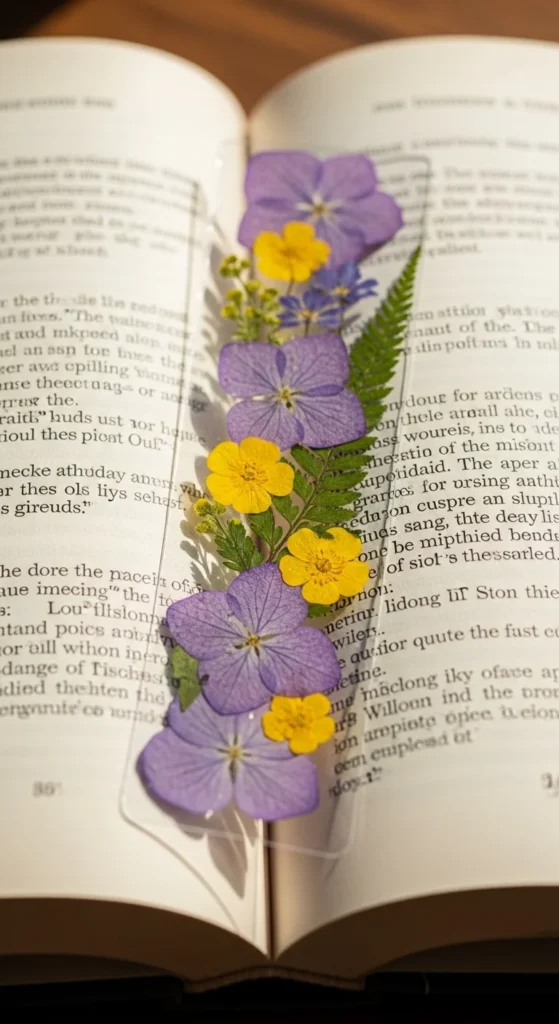
Bookmarks are simple, useful, and giftable. Cut a bookmark shape from sturdy cardstock. Glue a book page on top as the front layer.
Arrange pressed flowers in the center. Seal with clear laminate sheets or contact paper. Punch a hole and add ribbon or a tassel.
Budget tip: Use clear packing tape in strips if you don’t have laminate.
Stick to small flowers and keep spacing neat. This is a quick craft that looks polished when edges are trimmed evenly.
11. Book Stack Lamp Base
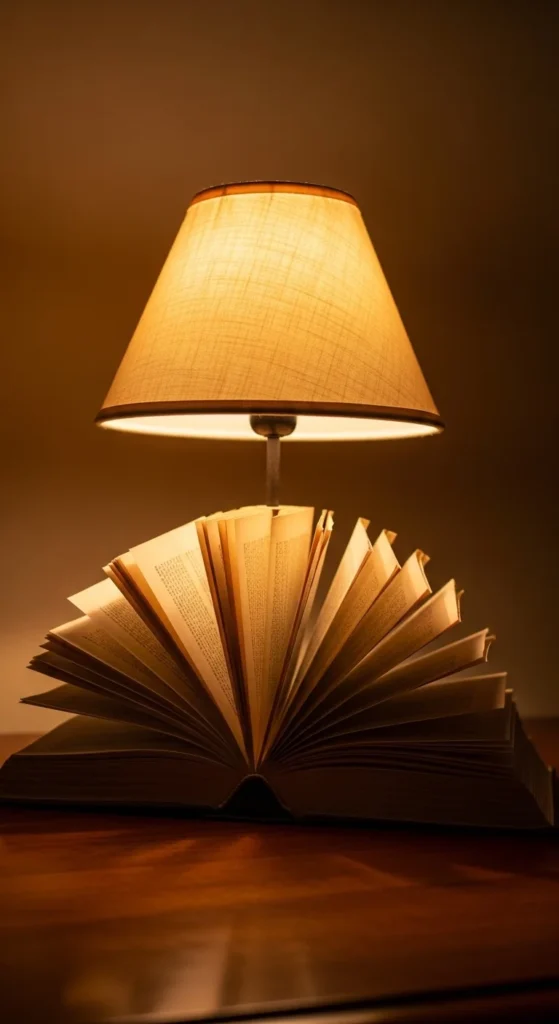
A book lamp is a statement piece for a reading nook. Use a small stack of hardcovers. Drill a hole through the center for a lamp kit cord, or build around an existing lamp base if you have one.
Glue books together so they don’t slide. Keep spines facing outward for a clean look.
Add felt pads underneath to protect surfaces.
Budget tip: Use an inexpensive lamp kit and thrifted books.
If drilling feels hard, make a faux version by stacking books around a slim lamp stand. It still gives the same cozy vibe.
12. Paper Chain Garland from Book Pages
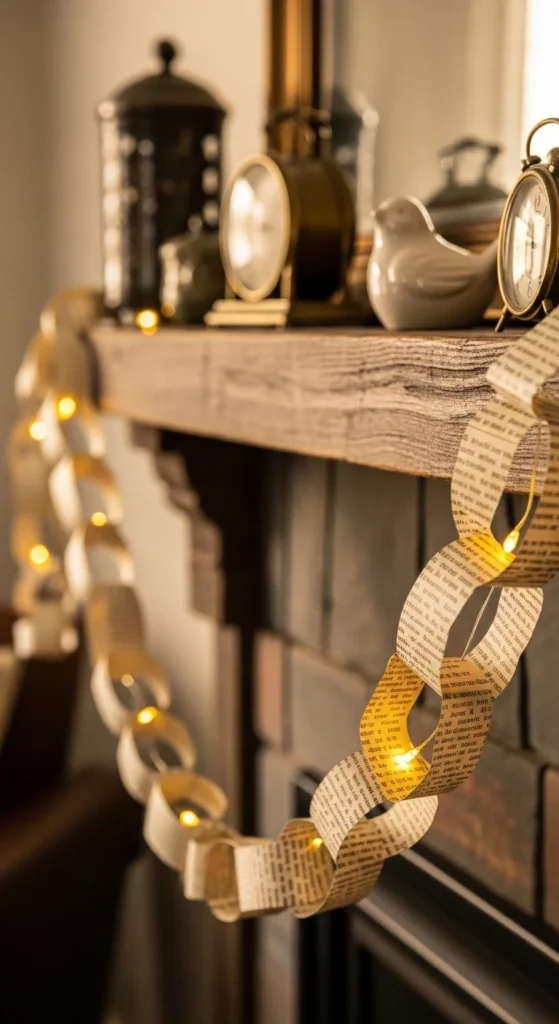
This is a classic craft that looks surprisingly stylish with printed pages. Cut strips of book pages. Loop one strip into a ring and glue. Thread the next strip through and repeat.
Make the chain as long as you want. Drape it over shelves, windows, or party tables.
Budget tip: Use glue stick or tape to go faster.
For a cleaner look, keep strip sizes consistent. You can also mix in a few kraft paper loops to add contrast.
13. Rolled Paper Quilling Monogram

Quilling with book pages makes a personal gift. Cut thin strips of pages and roll them into coils. Pinch some into teardrops and shapes.
Arrange coils into a letter shape on cardstock. Glue in place and let dry. Frame it for a finished piece.
Budget tip: Use a toothpick as a rolling tool.
Start with one letter. Keep the design airy, not packed tight. A simple monogram looks more modern and easier to read.
14. Book Page Lantern with LED Candle
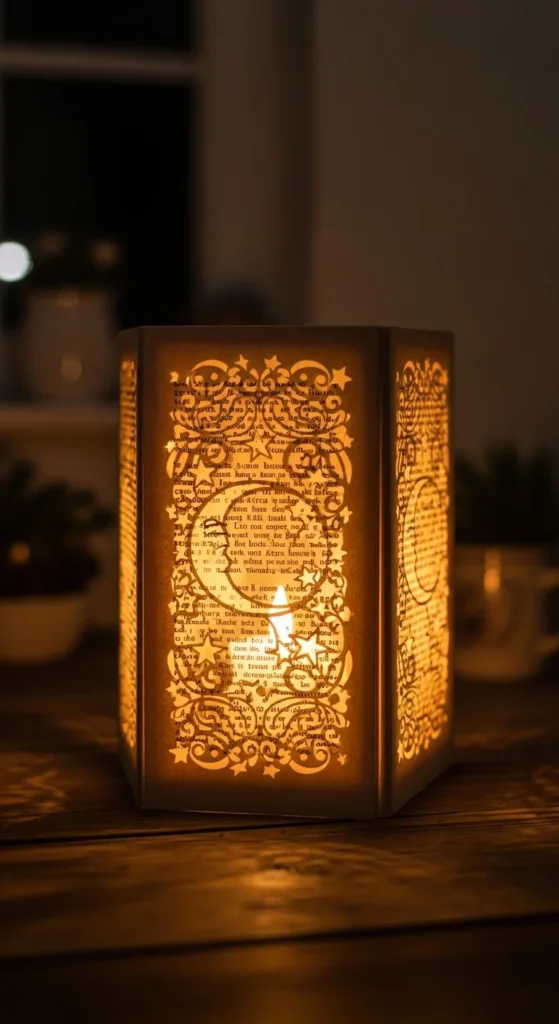
Lanterns feel cozy and make great decor. Wrap book pages around a clean glass jar. Cut simple shapes like stars, leaves, or circles, then glue the page sleeve to the jar.
Place a battery LED candle inside. The light glows through the paper.
Budget tip: Use jars from the kitchen and low-cost LED candles.
Keep cutouts simple so they look neat. This craft is great for seasonal decor too. Swap shapes for hearts, snowflakes, or flowers.
15. DIY Book Page Envelopes
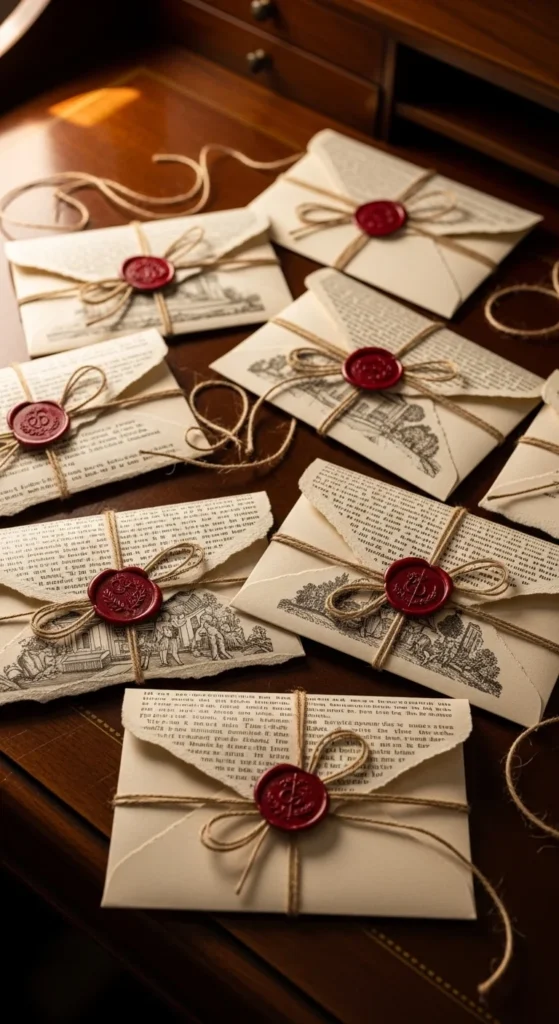
Book page envelopes look charming for notes and gift cards. Use an envelope template and trace it onto book pages. Cut, fold, and glue the edges.
Add a small sticker or wax seal for closure.
Budget tip: Use glue stick and scrap paper for lining.
These envelopes work well with handwritten letters. Pair them with a small handmade card for a thoughtful set.
16. Upcycled Book Cover Journal
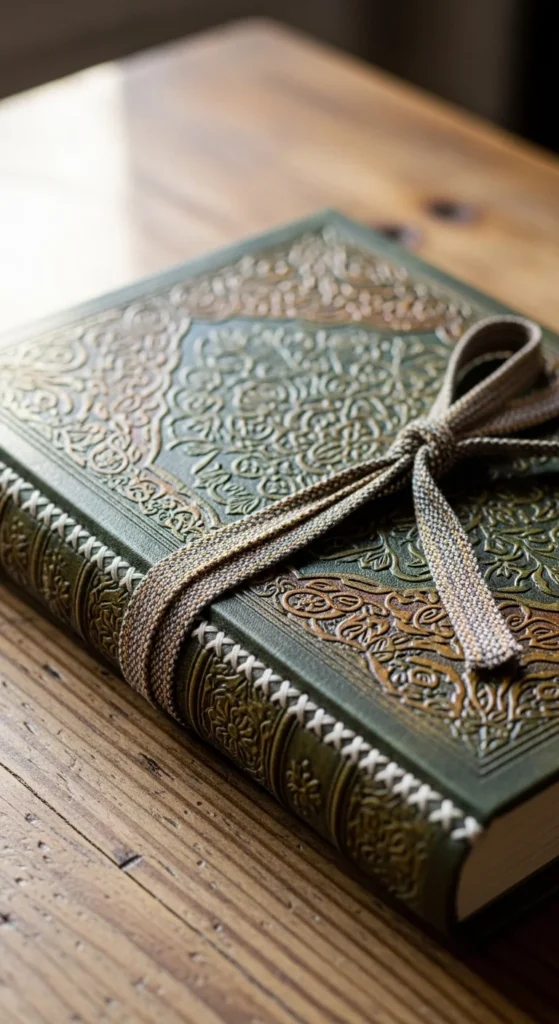
Turn an old hardcover into a new journal. Remove the original pages carefully, keeping the cover intact. Insert blank paper signatures and stitch them into the spine.
Add a ribbon tie or elastic band for closure.
Budget tip: Use printer paper for pages.
This project looks special because it reuses a real book cover. It’s great for journaling, sketching, or planning. Choose a cover that fits the person’s taste.
17. Book Page Wall Collage with Watercolor
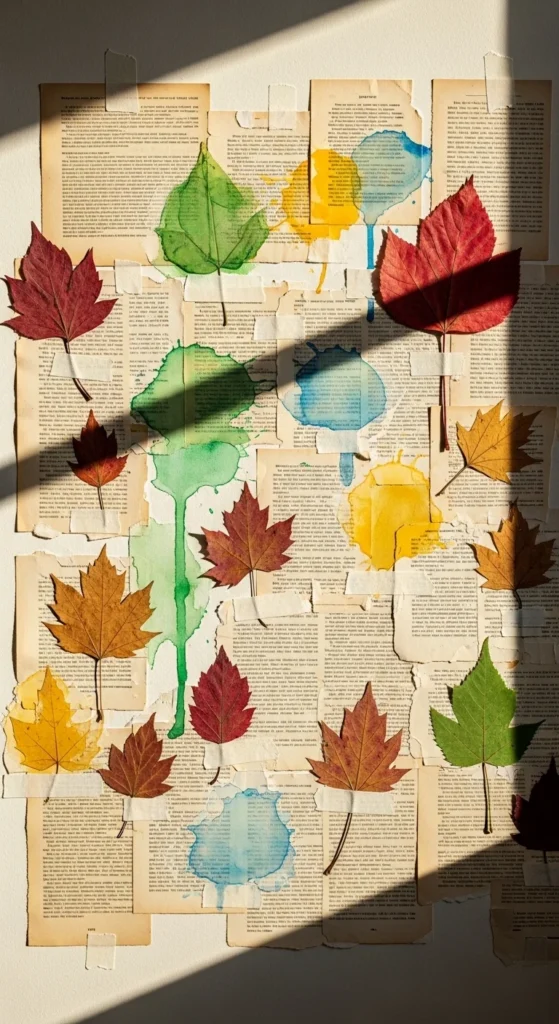
A page collage is easy and fills a wall fast. Tear pages into rough shapes. Layer them on a board or directly on a wall using removable tape.
Add light watercolor washes for color. Keep tones soft so the text still shows.
Budget tip: Use cheap watercolor and a wide brush.
Try one color family. Soft blues or warm browns work well. This is great for dorm rooms, reading corners, and creative studios.
18. Hanging Book Page Mobile

Mobiles feel playful and look great near windows. Cut stars, moons, or butterflies from book pages. Stitch or glue them onto thin string.
Tie strings to an embroidery hoop or a branch.
Hang it where air movement is gentle so it spins slightly.
Budget tip: Use a stick from outside as the hanger.
Keep shapes consistent for a clean look. This craft works for nurseries, bedrooms, or cozy reading spaces.
19. Book Spine Wall Art Grid
If you have damaged books, save the spines. Cut spines carefully and mount them onto a backing board in a neat grid.
Keep spacing even. Use strong glue or double-sided tape.
Budget tip: Use a foam board as the base.
This project turns book parts into bold decor without heavy crafting. It’s perfect for offices, libraries, and reading rooms.
20. Sealed Book Page Coasters
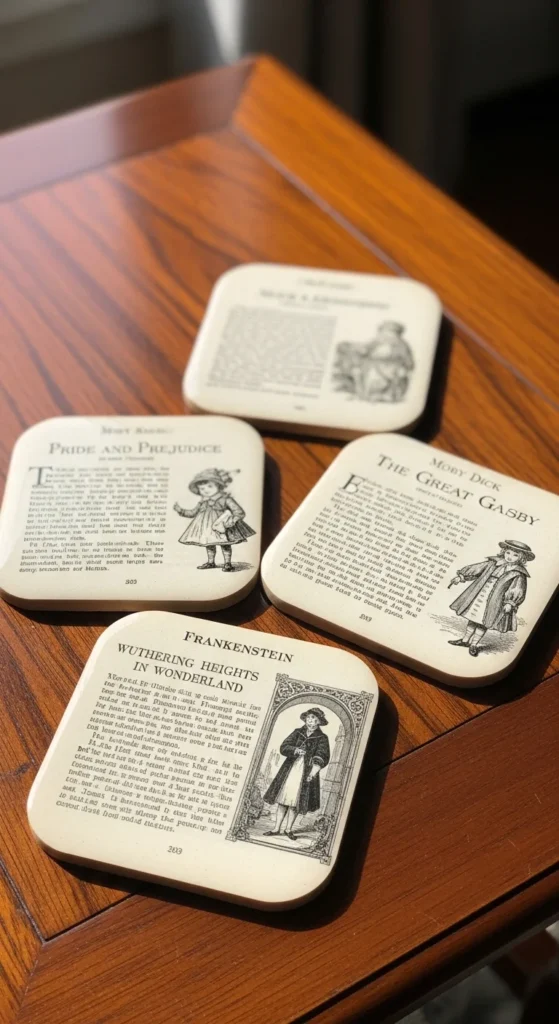
Paper coasters can be durable with sealing. Cut circles or squares from thick cardboard. Glue book pages on top. Trim edges neatly.
Seal with clear decoupage glue in thin coats, letting each coat dry. Add a final coat for water resistance.
Budget tip: Use packaging cardboard for bases.
These make great gifts when bundled as a set of four. Keep the page selection consistent for a coordinated look.
21. Book Page Flower Bouquet Wrap
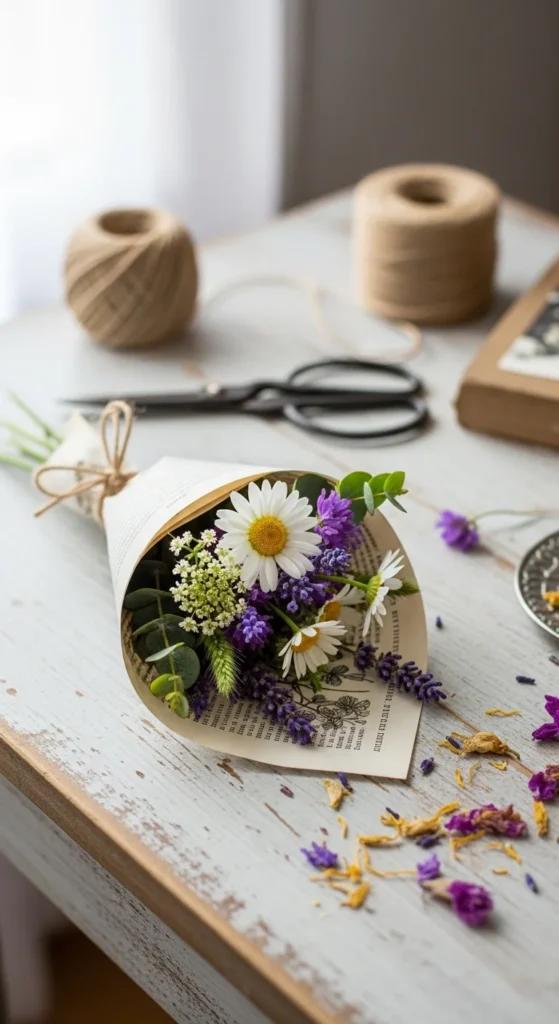
Wrap a small bouquet in book pages for a literary touch. Use 2–3 pages as the outer wrap and fold corners inward.
Tie with twine. Add a small dried flower stem for detail.
Budget tip: Use grocery store flowers and thrift book pages.
This is a quick way to make a simple gift feel personal. It works well for birthdays, graduations, or thank-you gestures.
22. Book Page Gift Tags
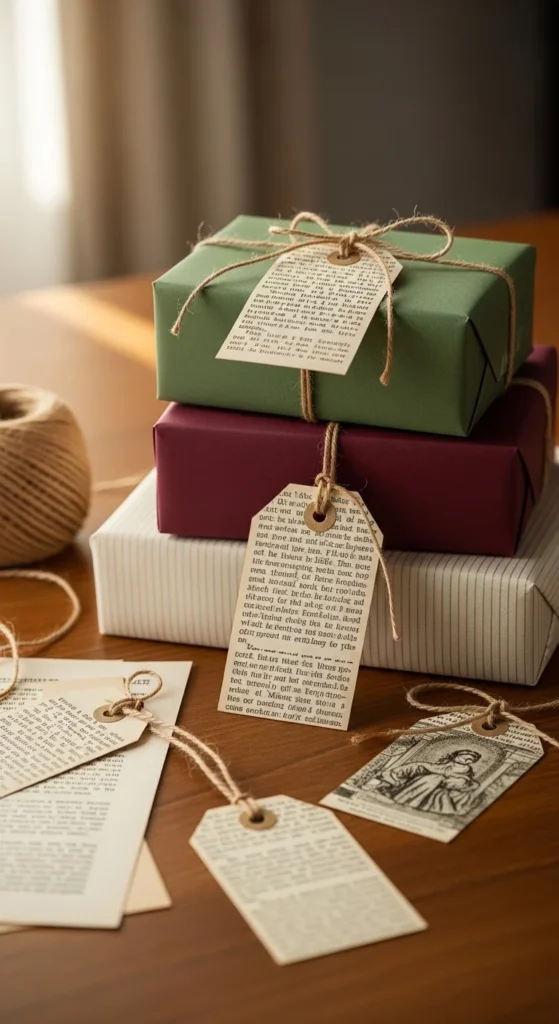
Gift tags are quick and useful. Cut tag shapes from cardstock. Glue book pages on top. Punch a hole and tie with string.
Add a small pressed leaf or tiny paper flower for detail.
Budget tip: Make many at once from one book.
Keep edges clean and consistent. A simple set of tags makes any gift look more thoughtful without extra cost.
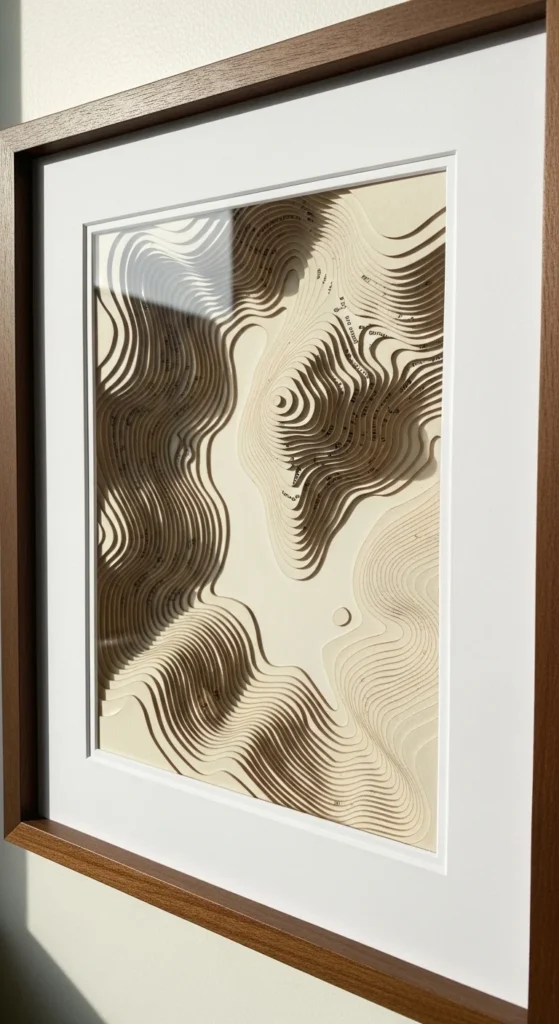
23. Page Layer “Map” Wall Art
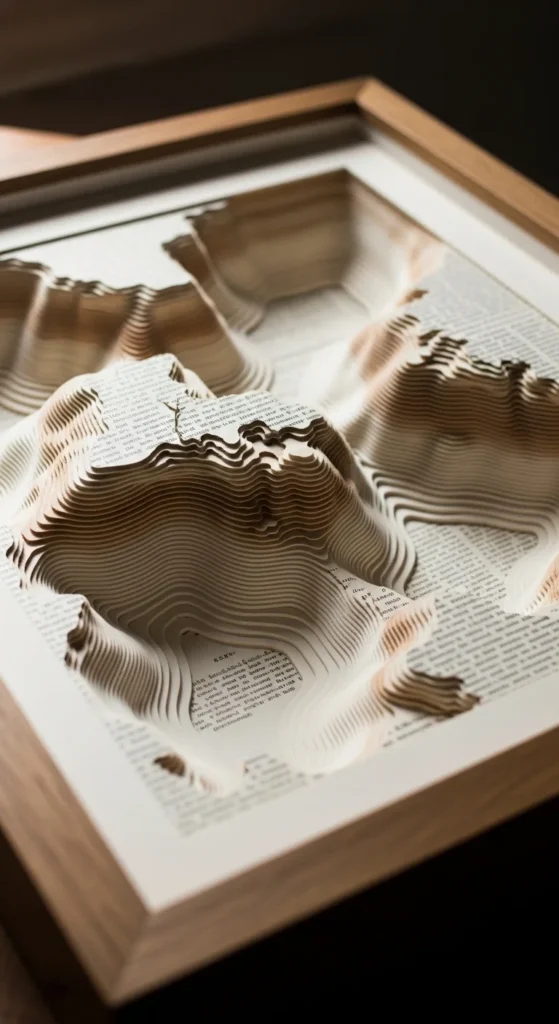
This looks like a topographic map but uses pages. Tear pages into irregular shapes. Layer them like contour lines on a board, keeping the center higher.
Glue each layer down and let it dry flat. Paint edges lightly with watercolor for a gentle outline effect.
Budget tip: Use a shallow thrift frame.
Stick to one color for edges. Clean layers create the “map” look without complicated steps.
24. Book Page Tassel Garland
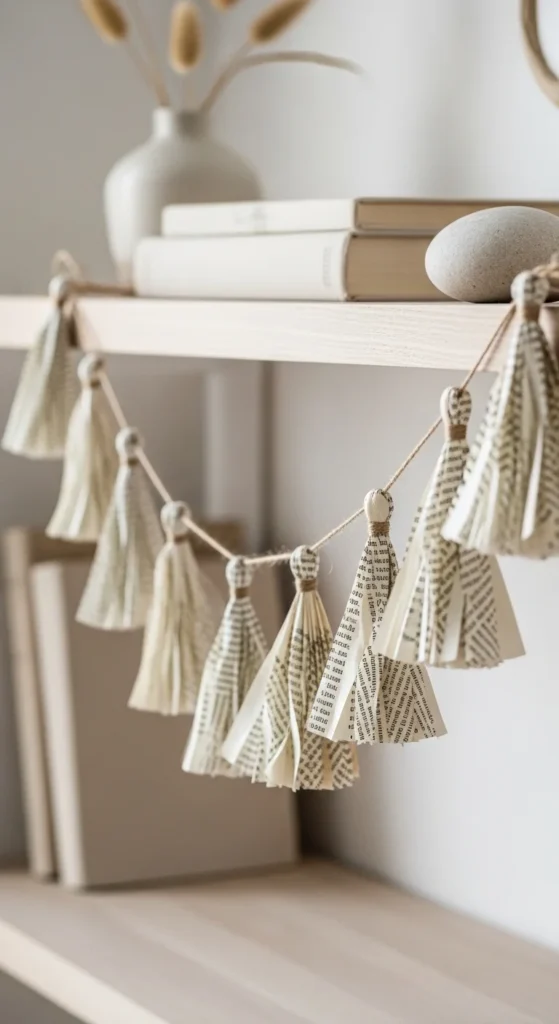
Tassel garlands are simple and look cute in reading corners. Cut pages into strips. Roll and tie one end tightly, then fringe the other end with scissors.
Make several tassels and tie them onto string.
Budget tip: Use yarn scraps for tying tassels.
Keep tassel sizes similar. This garland works well for parties, classrooms, and bookshelf styling.
25. Folded Book Page Stars
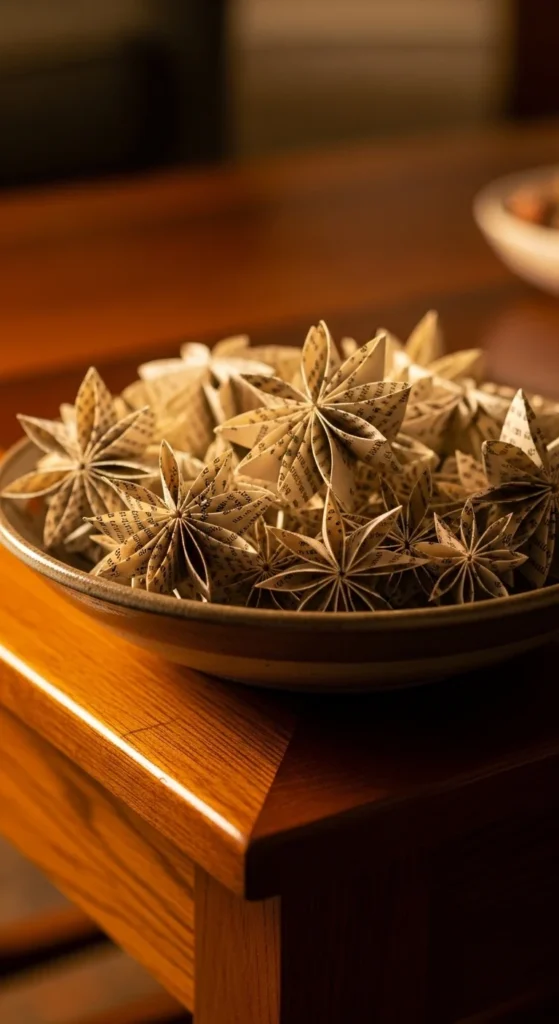
Folded stars look great as bowl fillers or ornaments. Cut squares from pages. Use a simple star fold pattern and repeat.
Make a set of 10–20. Display them in a bowl or hang with string.
Budget tip: Use thin paperback pages for easier folds.
If you want variation, lightly ink the edges with tea or coffee for an aged look. Keep it subtle so it stays clean.
26. Book Page Pennant Banner

Pennant banners are easy and cheerful. Cut triangles from book pages and back them with kraft paper for strength.
Punch holes or tape them onto string. Hang above desks, shelves, or party tables.
Budget tip: Use paper bags as backing.
Choose pages with larger print so the pattern reads from far away. Keep spacing even so it looks tidy.
27. Book Page Photo Mat Frame
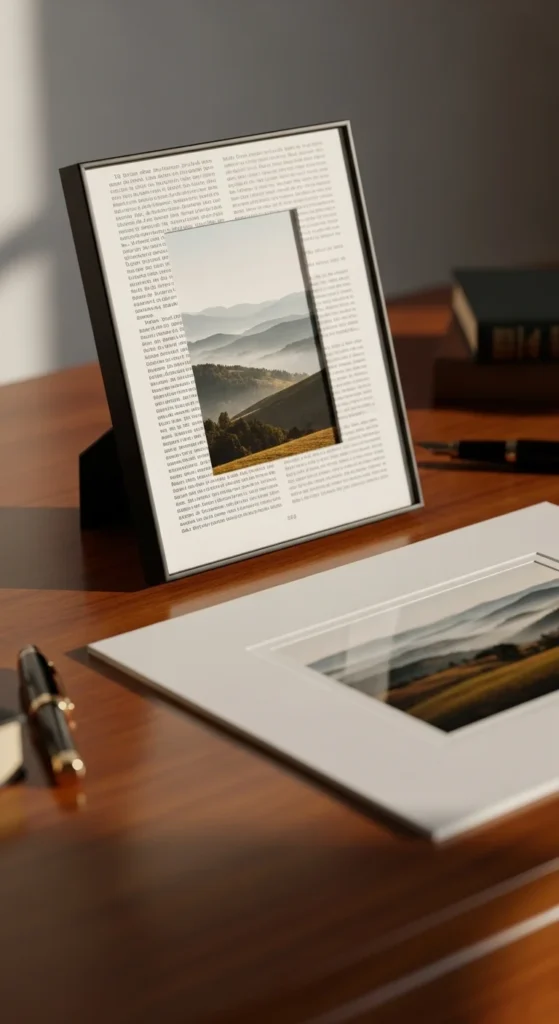
A page photo mat gives a normal frame a bookish feel. Cut a book page to fit inside your frame as the mat background. Cut a clean rectangle in the center for your photo.
Place the photo behind the cutout and reassemble the frame.
Budget tip: Use frames you already have and swap mats seasonally.
Pick pages from meaningful books, like a favorite novel or poetry book. Keep the page clean and not torn for a more polished look. This is a simple project with a big visual payoff.
Conclusion
Book art DIY projects are a smart way to reuse old books and create decor that feels personal. Start with one quick idea like gift tags or a bookmark, then try a bigger project like a shadowbox or journal cover when you have time. Stick to clean cuts, simple shapes, and a calm color palette. You’ll end up with handmade pieces that look great on shelves, walls, and desks—and you’ll enjoy the process too.


