If you like the “custom home” look but don’t want complicated builds, simple wood projects are your best friend. A few straight cuts, clean sanding, and a calm finish can make basic boards look like boutique pieces. You don’t need fancy equipment either. Many of these projects work with scrap wood, a handsaw, wood glue, sandpaper, and a drill. The secret is consistency: even spacing, smooth edges, and matching hardware. Try one project, then batch-make a set for a pulled-together look across your space.
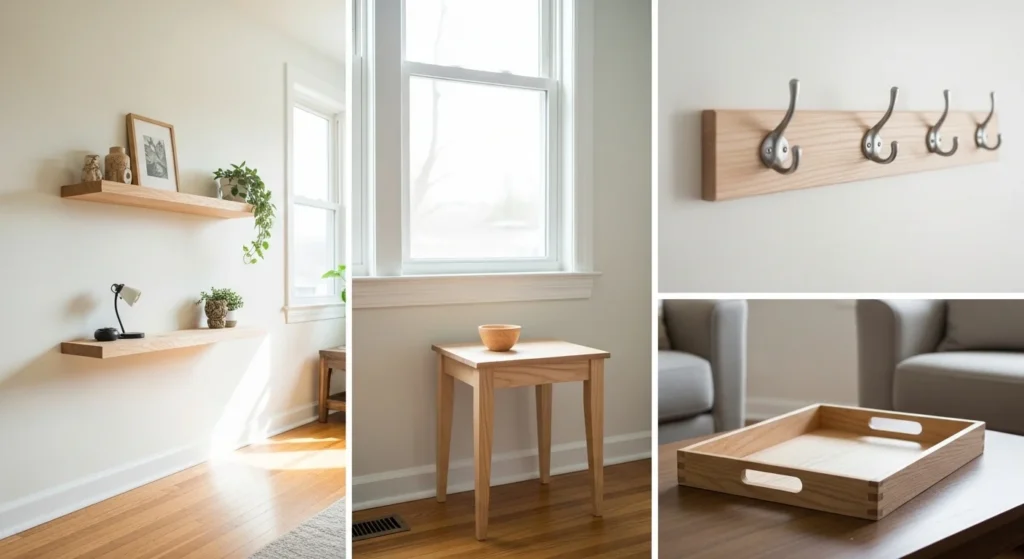
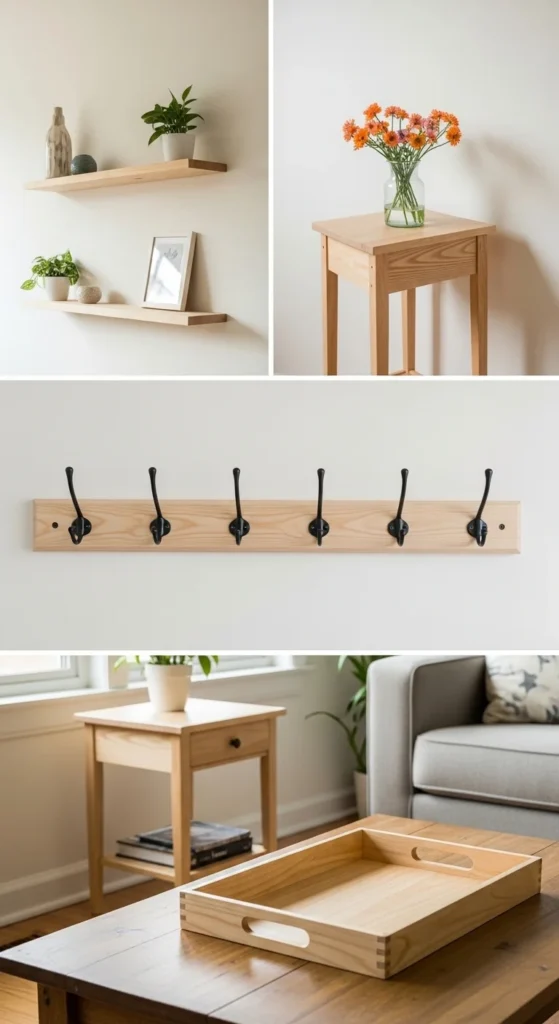
1) Floating Shelf With Hidden-Look Brackets
A floating shelf looks like a high-end upgrade, even when it’s made from one board. Start with a straight scrap plank or an inexpensive pine board. Cut it to a clean length like 24 or 30 inches.
Sand the top and front edge until it feels silky. That’s where hands and eyes go first. Slightly round the corners with sandpaper for a “finished furniture” feel.
Use two small brackets under the shelf. Mount them level and evenly spaced. If you want the hidden look, choose slim brackets and tuck them back from the front edge.
Budget tip: stain the shelf one warm tone and use matte black screws and brackets. That combo photographs like a designer piece.
DIY example: mount one shelf near the entryway for keys and a small bowl. Or hang two shelves stacked in the bathroom for rolled towels and a candle.
Keep it simple. The clean line is the whole point.
2) Wall Hook Rail With Matching Hardware

A hook rail looks custom when the spacing is perfect. Use a scrap board about 3–5 inches wide. Cut it to 18–30 inches depending on your wall.
Mark hook locations with a tape measure. Use equal spacing, not “eyeballed” spacing. Even a basic board looks upscale when everything lines up.
Sand edges smooth and soften the corners. Then seal it with a clear coat or stain it darker for contrast.
Budget tip: buy a set of matching hooks (all same size, same finish). Mixed hooks can look messy.
DIY example: mount it by the door for keys and light bags. Add a small shelf above later if you want a full entryway station.
Mount into studs when possible. If not, use solid wall anchors. The project stays small, but it gets daily use, so make it sturdy.
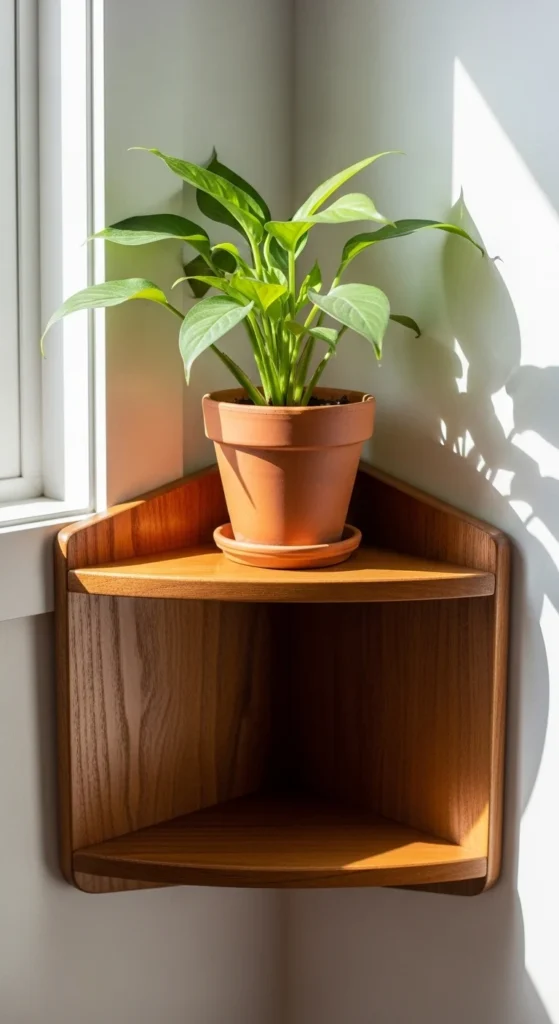
3) Modern Plant Stand With Straight Legs
Plant stands instantly change a corner. Keep the design simple: a square top and four straight legs. No tricky angles.
Use scrap boards for the top. For legs, use straight pieces of pine or leftover trim. Screw and glue legs from underneath the top so fasteners don’t show.
Sand every edge you can touch. A smooth edge reads as “store-bought.” Add felt pads to the bottom so it doesn’t scratch floors.
Budget tip: use one stain color across multiple stands. Matching tones make your home look coordinated.
DIY example: make two stands in different heights and place them together. The pair makes even cheap plants look styled.
If your wood scraps vary in color, stain helps blend them. If your scraps are already pretty, a clear satin finish is enough.
4) Serving Tray With Cutout Handles
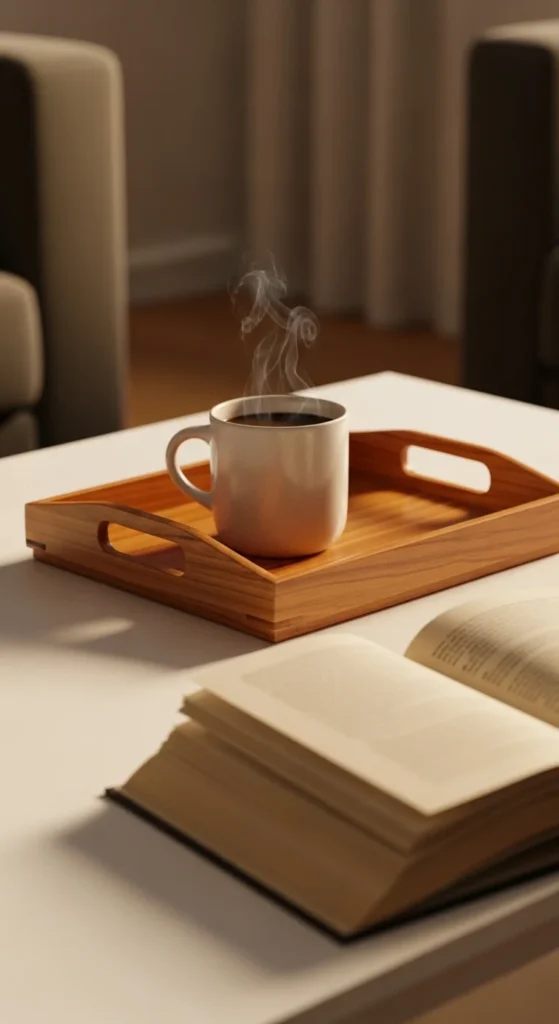
A tray looks fancy, but it’s just a shallow box. Use a base board and four low side walls. Keep the sides around 1.5–2 inches tall.
Cut simple handle openings on the short sides. Sand those openings extra well. Rough handle edges ruin the “nice” feeling.
Glue and nail the sides to the base. If you only have glue, clamp firmly and let it dry fully.
Budget tip: if your wood has dents, stain it darker. Darker tones hide imperfections better.
DIY example: keep the tray on your coffee table for remotes, a candle, and a small plant. Or use it on a dresser for perfume bottles and jewelry.
A clear sealer makes it wipeable, which keeps it looking clean.
5) Chunky Wood Candle Holders (Set of 3)
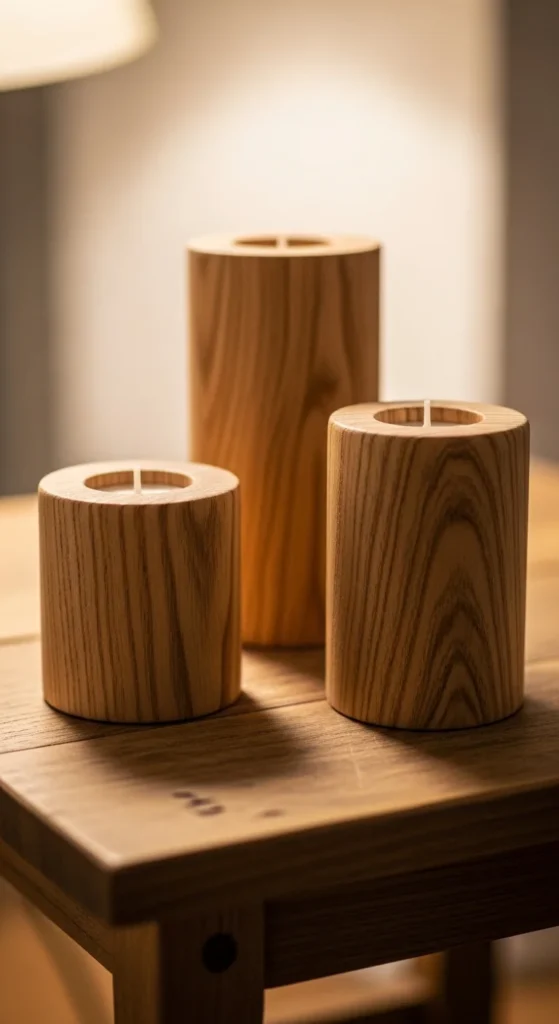
Candle holders look premium when they’re a set. Use thick scrap blocks and drill shallow recesses for tea lights (in metal cups).
Sand the top surface smooth and round edges slightly. Then seal with a clear coat.
Budget tip: make three sizes. Even small differences in height create a “decor set” look.
DIY example: place them on a dining table or shelf. Add one small vase beside them to complete the scene.
If you don’t have a drill bit for the recess, you can skip the recess and use tapered candles in a simple drilled hole. Keep it stable and centered.
Keep the design plain. Wood grain + clean edges already looks expensive.
6) Picture Ledge Shelf With Front Lip
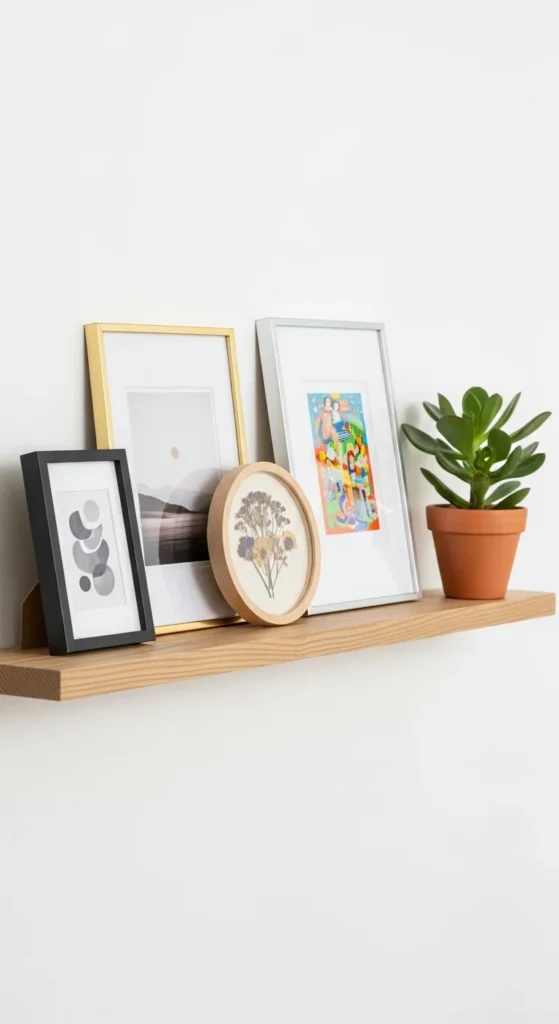
Picture ledges make walls look curated. Build one long narrow shelf and add a thin lip strip on the front edge.
Use scrap wood for the shelf and a thin strip for the lip. Glue the lip on and clamp.
Sand the front edge smooth. This is the detail your eye catches.
Budget tip: paint the ledge the same color as the wall for a built-in look. Or stain it and keep the wall neutral.
DIY example: place it above a desk and rotate frames seasonally. It feels like new decor without new purchases.
Mount level. A slightly crooked ledge is very noticeable, so take an extra minute with a level.
7) Simple Cutting Board With Rounded Corners
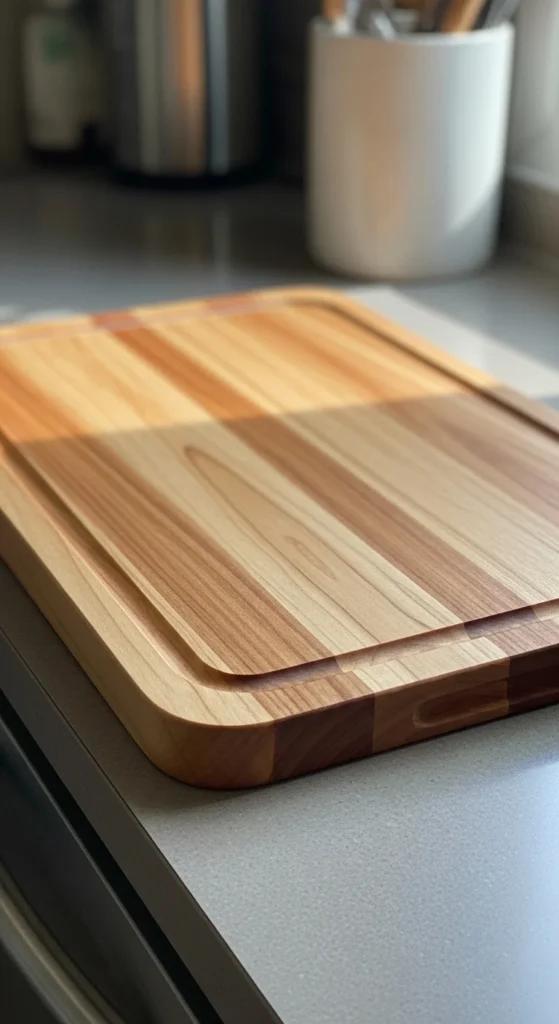
Cutting boards look high-end when the edges are smooth and the shape is clean. Start with a solid board or a glue-up of scrap strips.
Sand the face flat. Then round the corners and edges. That soft curve changes everything.
Finish with food-safe oil. Reapply after washing to keep it rich-looking.
Budget tip: smaller boards use less wood and still look gift-ready. Mini boards sell well too.
DIY example: make two sizes—one small for snacks and one medium for prep. Stack them on the counter for a styled look.
If you’re using scrap strips, keep strip widths consistent. Uneven strips make the board look accidental instead of intentional.
8) Minimal Bedside “Cube” Table
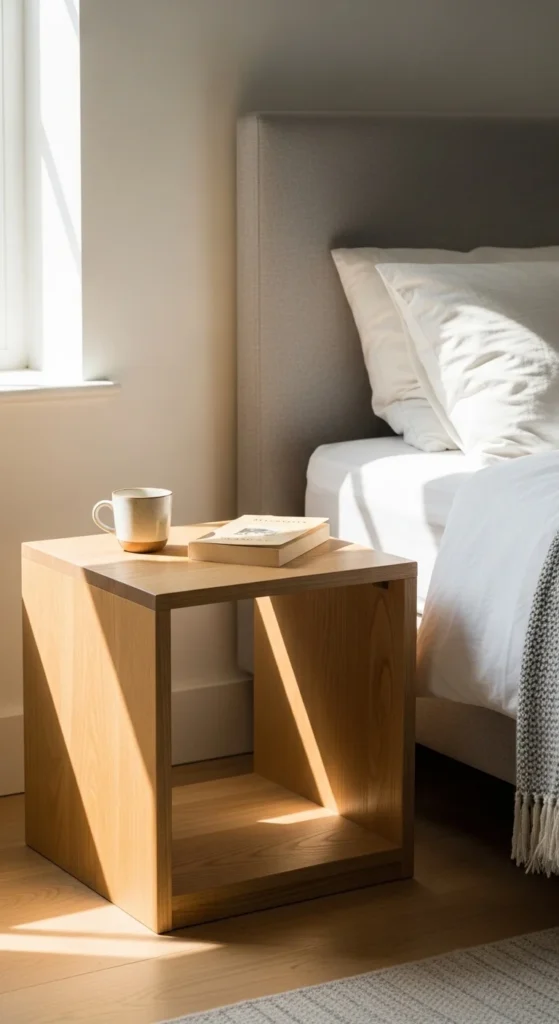
A cube table looks modern and expensive, but it’s just five boards. Cut four sides and a top. Leave the back open if you want an easier build.
Glue and screw from the inside where possible. Sand the outer corners until they feel smooth.
Budget tip: use plywood for the structure, then add a thin wood edge strip to hide layers. Even tape-on edge banding can look clean when sanded.
DIY example: use it as a bedside table or a small plant stand.
Keep the proportions simple. A 14–16 inch cube works in most rooms and doesn’t feel bulky.
9) Peg Rail With Wooden Dowels
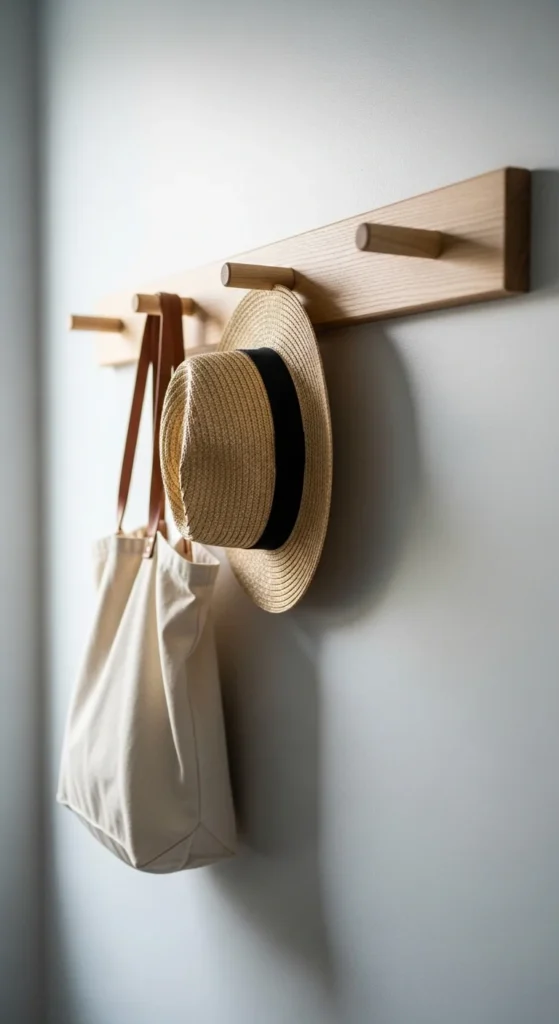
Peg rails feel like a designer detail. Use a scrap strip board and drill evenly spaced holes. Glue dowels into the holes as pegs.
Sand the peg ends so they feel smooth and clean. Seal with a clear coat.
Budget tip: make the pegs identical length. That symmetry looks polished.
DIY example: hang kitchen towels, hats, or a light bag. Keep weight reasonable if you’re using anchors.
This project is great for apartments because it uses one short board and minimal mess.
10) Desk Riser for a Clean Work Setup
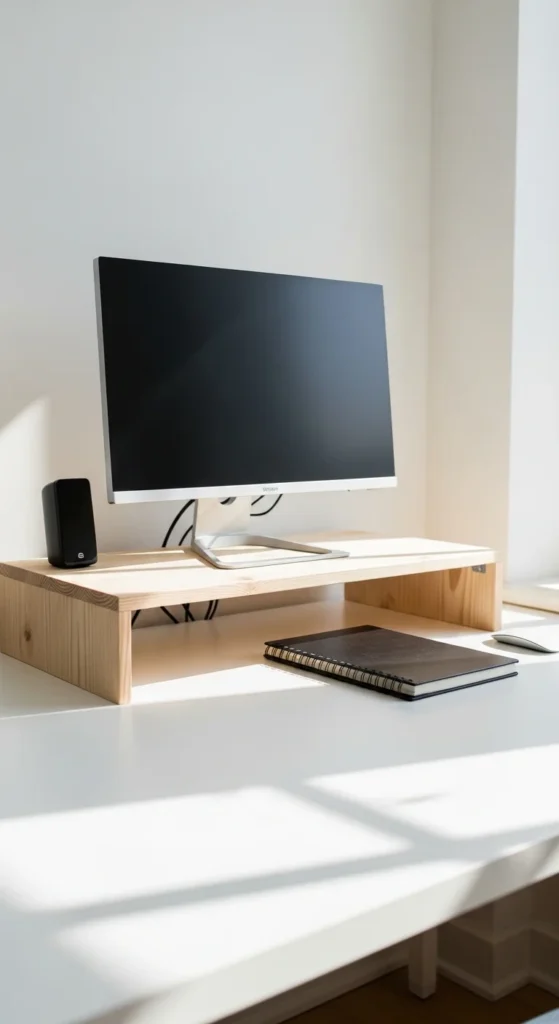
A desk riser makes a workspace look organized fast. Build a top platform and two side legs. Keep legs simple rectangles.
Sand the front edge extra smooth. That’s the “touch edge.”
Budget tip: use scrap wood for the legs and a nicer board for the top. You’ll see the top the most.
DIY example: store your keyboard under the riser when not in use. Add a small tray on the side for pens.
Seal it with a wipe-on finish so it stays clean-looking with daily use.
11) Rustic Crate Organizer That Stacks
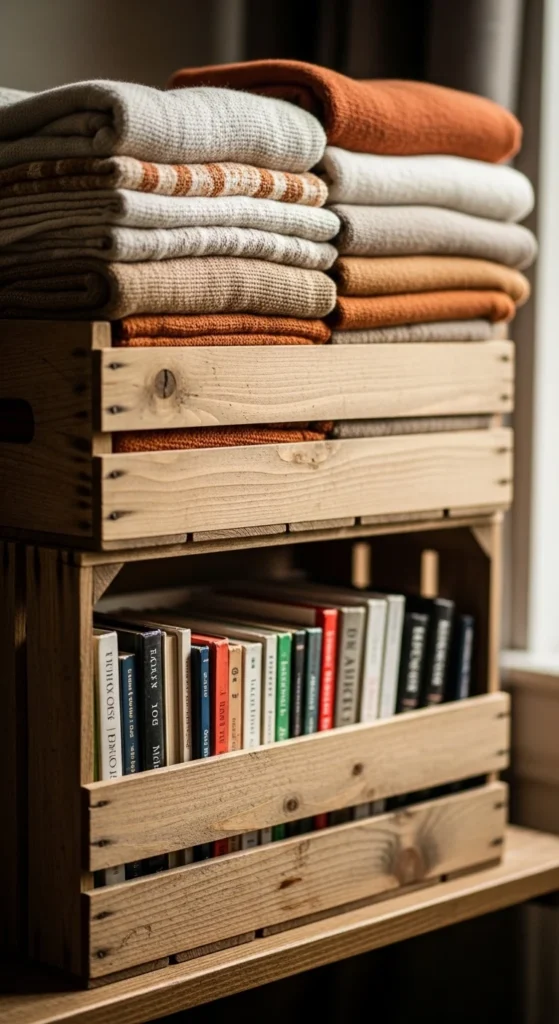
Crates can look expensive when they’re consistent. Use pallet slats or scrap boards, but keep board spacing even.
Sand the top edges and corners so it feels intentional, not rough.
Budget tip: build two crates in the same size so they stack neatly. Matching sets look better than one random crate.
DIY example: use them for toys, pantry storage, or craft supplies.
Add rope handles if you want a finished look. Keep the rope ends hidden inside for a cleaner style.
12) Minimal Wall Mail Pocket
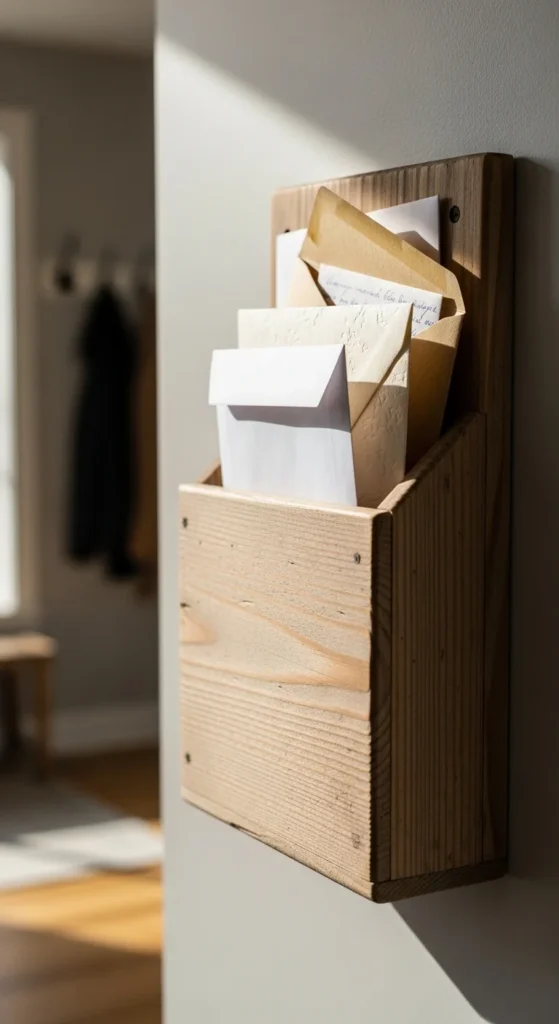
A mail pocket keeps clutter off counters. Build a shallow box with an open top and a slightly lower front.
Sand the edges well and seal it so it wipes clean.
Budget tip: use thin scrap boards and make it small. A compact pocket looks modern and fits apartments.
DIY example: add two hooks underneath for keys. That turns it into an entryway station.
Mount it level and centered. Straight lines make it look expensive.
13) Wood Coasters With Chamfered Edges
Chamfered edges (a small angled edge) make coasters look fancy. Cut squares from scrap wood and sand a slight angle on the top edge.
Sand the faces smooth. Seal with clear coat. Add felt pads underneath.
Budget tip: make a set of six and tie with simple twine. Sets look gift-ready.
DIY example: keep one set in the living room and another in the bedroom. Small repeats make the home feel styled.
If you want contrast, stain the edges darker than the top face. It’s a small detail that looks “designed.”
14) Simple Jewelry Organizer With Hooks + Tray
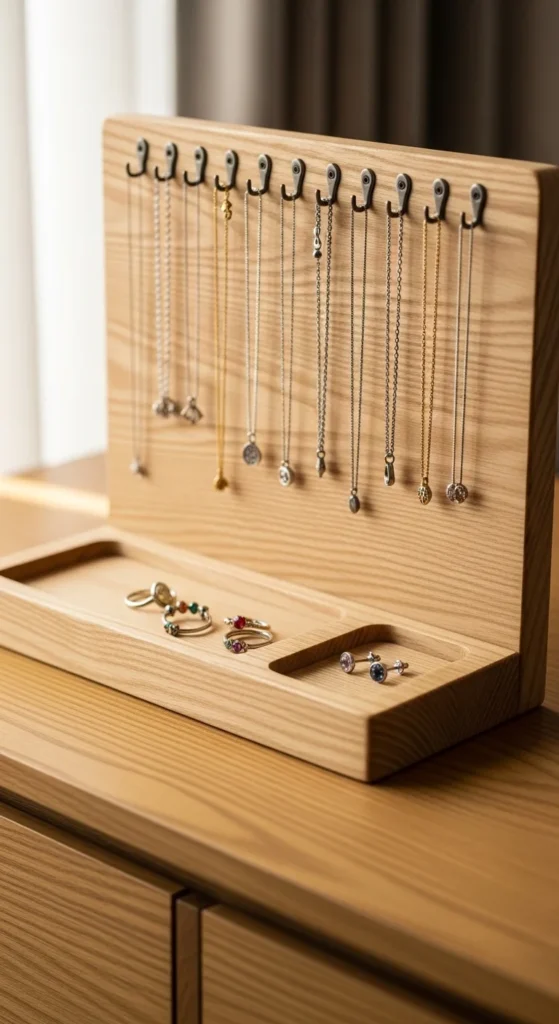
Jewelry organizers look custom when the hooks line up perfectly. Use a small board as a back. Add a shallow tray at the bottom.
Sand everything smooth. Seal it so it doesn’t snag chains.
Budget tip: use identical hooks and place them in a straight line. Symmetry reads as “high quality.”
DIY example: mount it on the wall or let it sit on a dresser. Add one small ring dish in the tray.
This project uses thin scraps well and makes a great gift.
15) Laptop Stand With Cable Slot
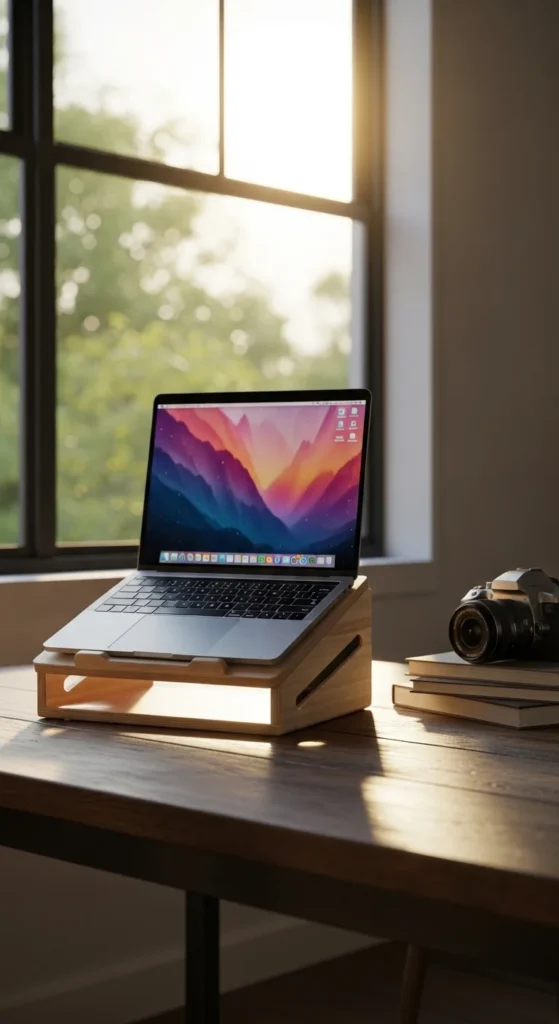
A laptop stand feels premium when it’s stable and smooth. Use two side supports and a top. Leave a gap at the back for airflow and cables.
Sand the front edge a lot. That’s where wrists touch.
Budget tip: if scrap boards are mismatched, paint the stand matte black. It hides mixed wood tones and looks modern.
DIY example: pair it with a small phone stand made from the leftover offcuts.
Keep angles simple. A gentle lean is enough.
16) Small Corner Shelf Triangle
Corner shelves look like built-ins when they’re neat. Cut a triangle top and attach two small support cleats underneath.
Sand the front edge smooth. Seal it.
Budget tip: use scrap plywood and paint it the wall color. It blends in and looks intentional.
DIY example: put one in the bathroom for a small plant or jar. Or use it in the kitchen for spices.
A small shelf is easier to mount level than a long one, which makes this a beginner-friendly “wins fast” project.
17) Minimal Wooden Soap Tray
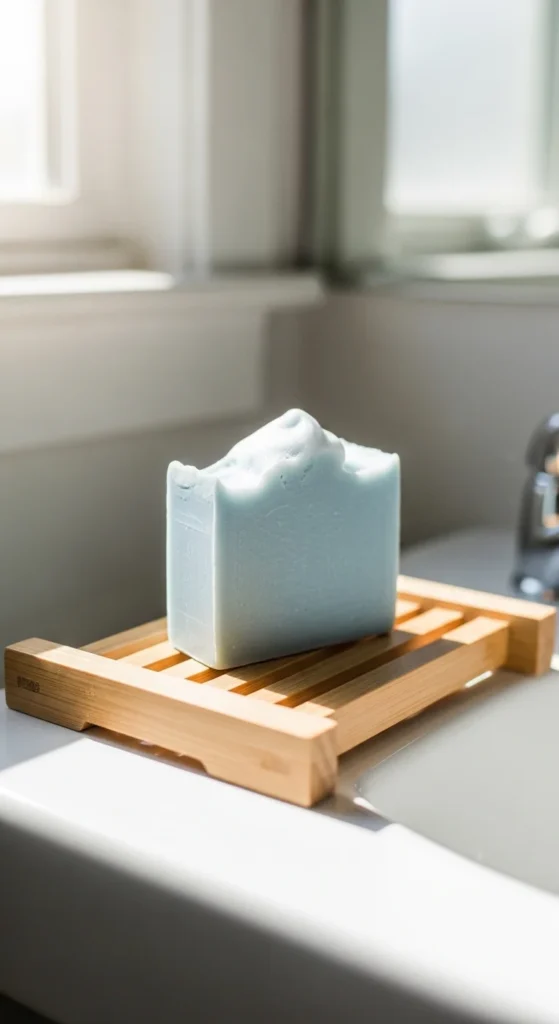
A soap tray looks fancy and uses tiny scraps. Make a small frame and add thin slats with small gaps so water drains.
Sand edges smooth and seal with a water-friendly finish.
Budget tip: use leftovers from a shelf project for slats.
DIY example: keep one by the kitchen sink and one in the bathroom. Matching pieces make a home feel cohesive.
Keep it simple and clean. Tiny projects look expensive when lines are straight and surfaces are smooth.
18) Simple Wooden Doormat Slat Runner
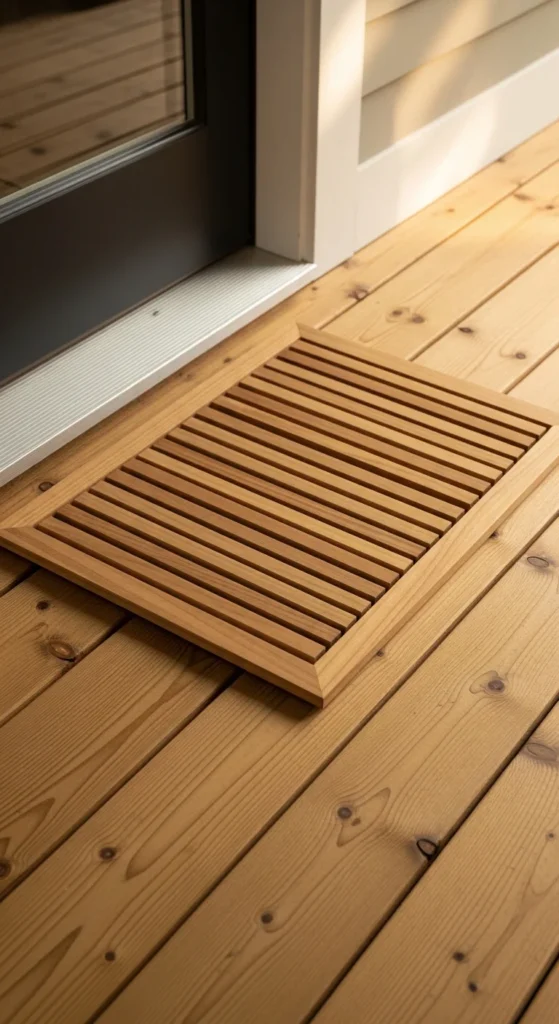
A wood slat doormat looks custom outside. Use small boards in a row and connect them from underneath with two support strips.
Keep slat spacing consistent. That’s what makes it look professional.
Budget tip: use pallet slats and sand the top well. Seal it for outdoor use.
DIY example: make a small one for a balcony door. It adds warmth without clutter.
This is a great scrap project because it uses many short pieces that are hard to use elsewhere.
19) Pencil Holder Block With Clean Holes
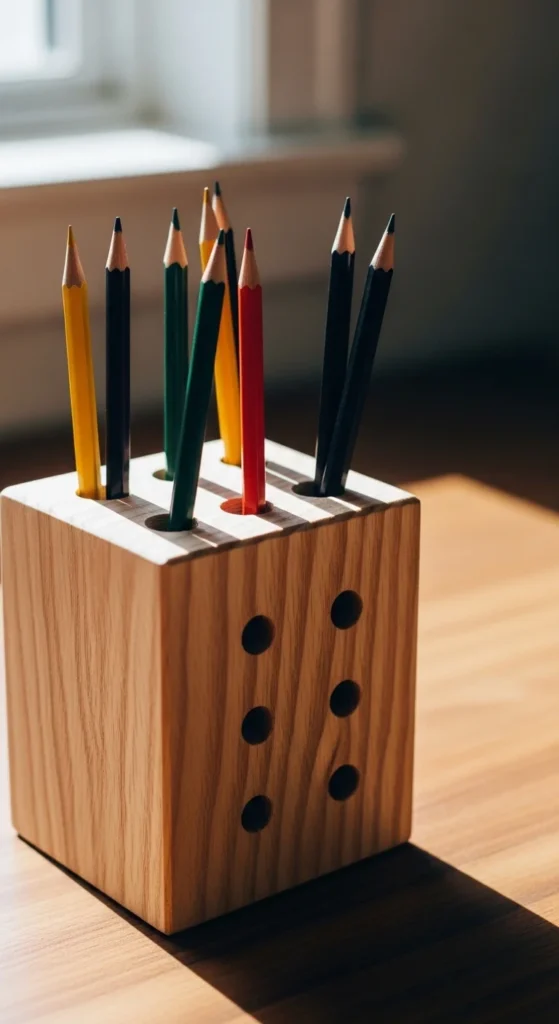
A pencil holder can look like boutique decor when the holes are evenly spaced. Use a thick scrap block. Drill holes for pens and pencils.
Sand the top surface smooth and round edges slightly.
Budget tip: stain it a darker tone and seal with satin finish. Dark + satin reads “nice” instantly.
DIY example: make one for your desk and one as a gift. Pair it with a small tray and it feels like a set.
If you don’t have a drill press, go slow with a hand drill. Mark hole points first and keep spacing consistent.
20) Simple Mirror Frame Strip
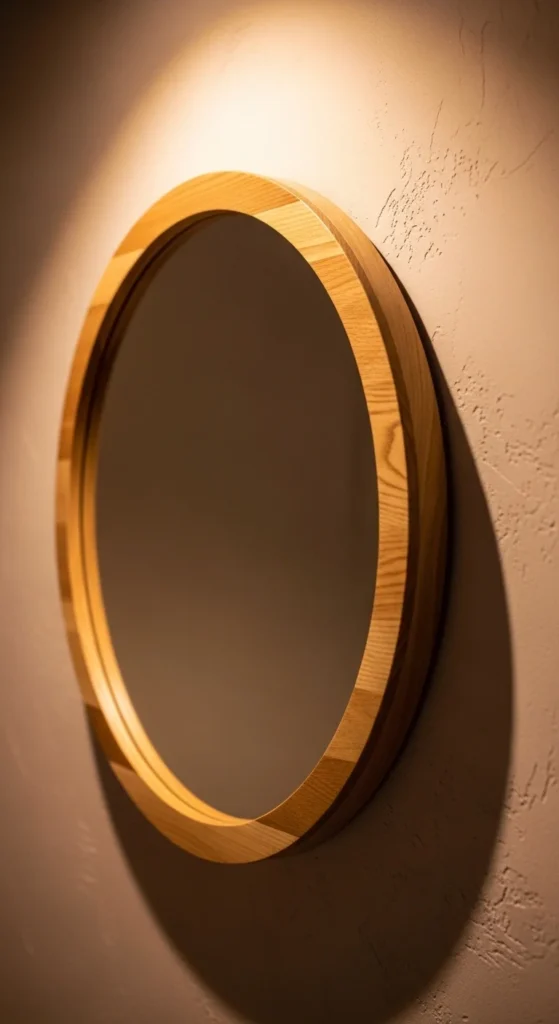
Adding a wood frame to a plain mirror changes the whole look. Use thin trim strips or scrap molding.
Cut pieces to fit around the mirror edge and glue carefully. Keep corners clean. Sand lightly and paint or stain.
Budget tip: paint the frame the same color as your hardware (black, brass tone, or white). That matching makes it feel coordinated.
DIY example: frame a mirror in the entryway for a quick “designer hallway” vibe.
Take your time with alignment. Straight lines make this look expensive.
21) Floating Nightstand Shelf (One Board + Two Brackets)
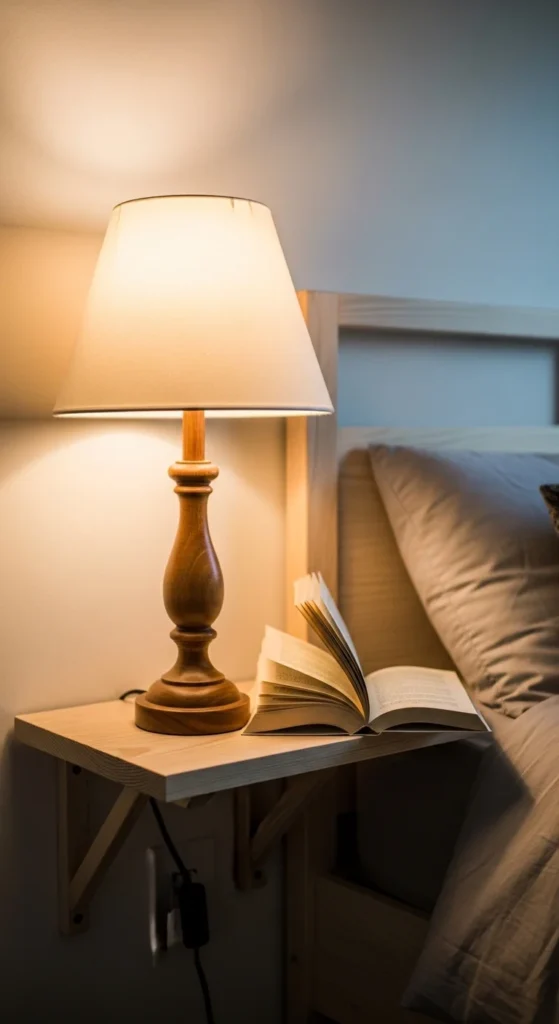
A floating nightstand shelf is perfect for small bedrooms. Use a thick board, sand it smooth, and mount with two brackets.
Budget tip: choose brackets that match your lamp base or drawer pulls. Matching metal finishes look intentional.
DIY example: mount it beside the bed and tuck a small basket underneath. You get storage without a bulky table.
Seal the shelf so it resists scuffs.
22) Simple Wood “Catchall” Bowl Tray

A shallow tray looks high-end when the edges are clean. Build a flat base with low sides. Keep side height about 1 inch.
Sand edges smooth. Seal it so it wipes clean.
Budget tip: use scrap wood for sides and one nicer piece for the base. That saves money and looks good.
DIY example: place it on an entry table for keys and coins. Or keep it on a dresser for small items.
Make two trays in matching sizes. Sets make spaces feel styled.
23) Simple Book Ledge for Kids’ Books
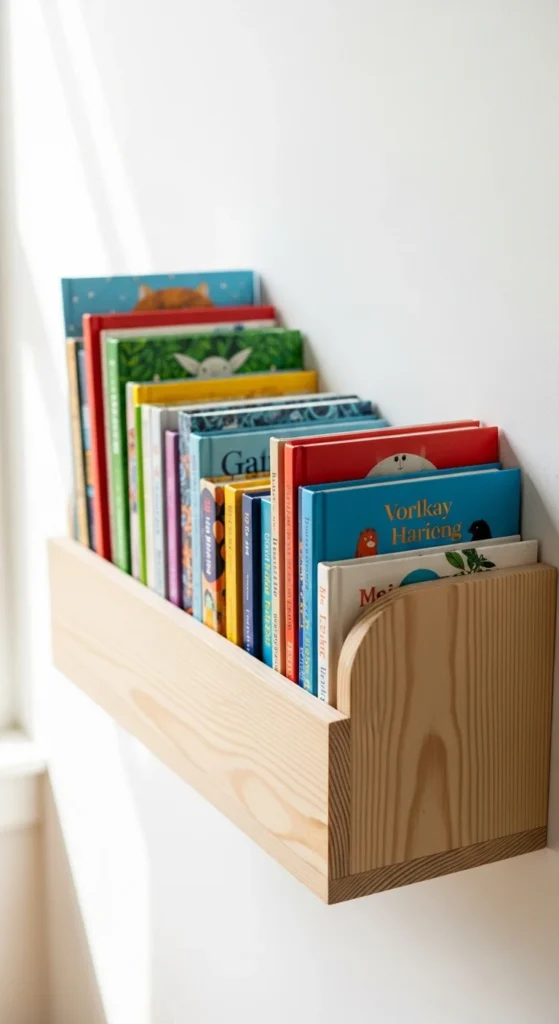
Book ledges look expensive in kids’ rooms and reading corners. Use a narrow shelf and add a front rail strip so books don’t fall.
Sand edges smooth for safety. Seal it.
Budget tip: paint it the wall color for a built-in look.
DIY example: mount two ledges stacked. Rotate book covers weekly for a fresh look without buying more.
Keep spacing even and mount level. Straight and tidy is what makes it look fancy.
24) Simple Tool-Free “Lean” Ladder Shelf (Mini)
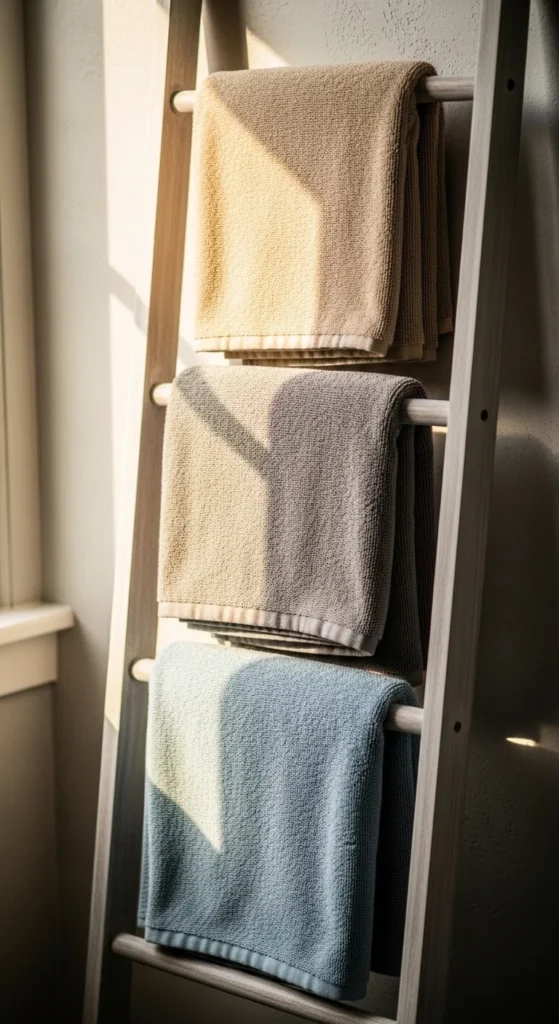
A mini ladder shelf feels stylish and is surprisingly simple. Use two long side pieces and attach rungs with screws.
Sand the side edges and rung tops. That touch comfort makes it feel higher quality.
Budget tip: make a small one that fits a bathroom corner. Smaller uses less wood and looks neat.
DIY example: hang towels or place small baskets on the rungs.
Seal it with a clear coat so it stays clean and smooth.
25) Simple Wall Shelf With Leather-Look Straps
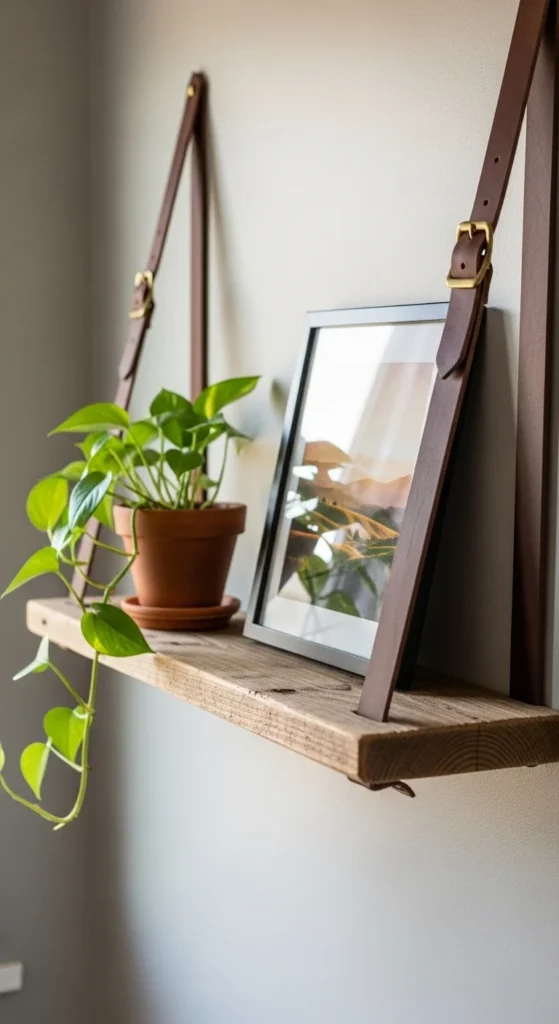
Strap shelves look expensive and are easy to build. Use one clean board. Sand it smooth and seal it.
Attach two straps (real leather or faux leather) to the wall and rest the shelf on them. Keep strap spacing equal and level.
Budget tip: faux leather belts from thrift stores work great. Cut off buckles and use screws with washers.
DIY example: hang one shelf in a bathroom for towels, or in a bedroom for plants.
The straps add visual interest, so keep the shelf board simple and clean.
Conclusion
Simple wood projects look expensive when you focus on the basics: straight cuts, even spacing, smooth sanding, and a calm finish. Start with one small upgrade like a shelf or tray. Then batch-make matching pieces to create a coordinated look across your home. Use scrap wood where you can, spend a little on matching hardware, and your results will look far pricier than the materials you started with.

DiyVisual is a DIY ideas resource for makers of every level. Our small editorial team researches and curates easy, budget-friendly craft, home decor, and handmade gift projects — explained step by step so anyone can recreate them at home with simple materials.


