Book page wall art is one of the easiest ways to turn old paper into decor that feels warm, nostalgic, and personal. You can cover a whole wall like wallpaper, frame a single page like a print, or create textured 3D pieces that cast beautiful shadows. The best projects are simple, low-cost, and friendly for renters who can’t put lots of holes in the wall. Below are 23 numbered ideas you can try with thrifted books, basic tools, and a little patience.
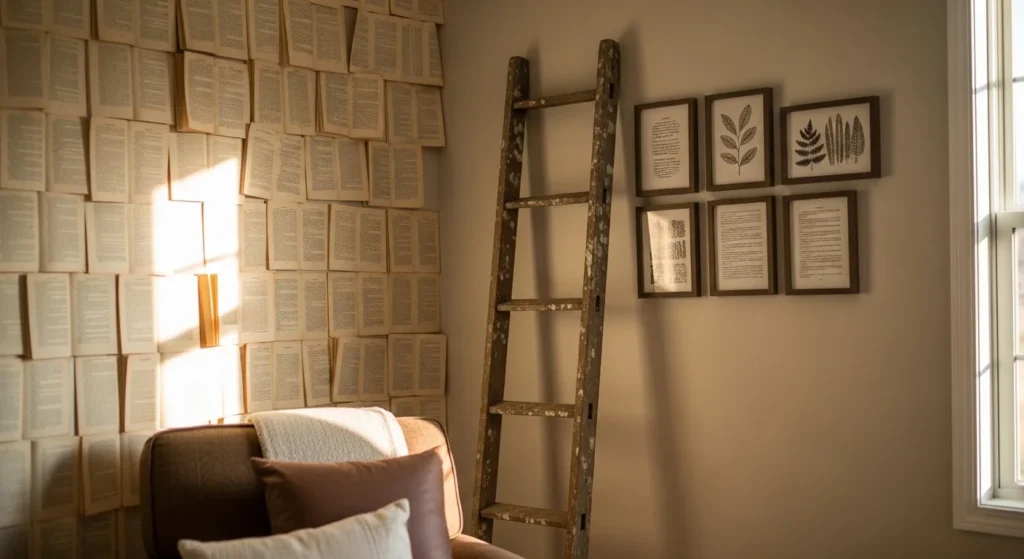
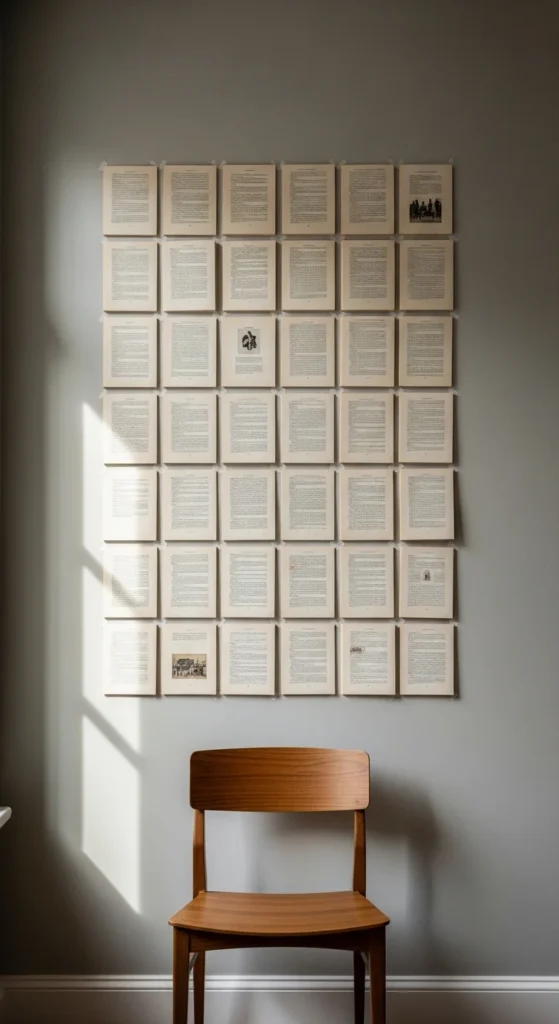
1. Wallpaper-Style Overlap Feature Wall
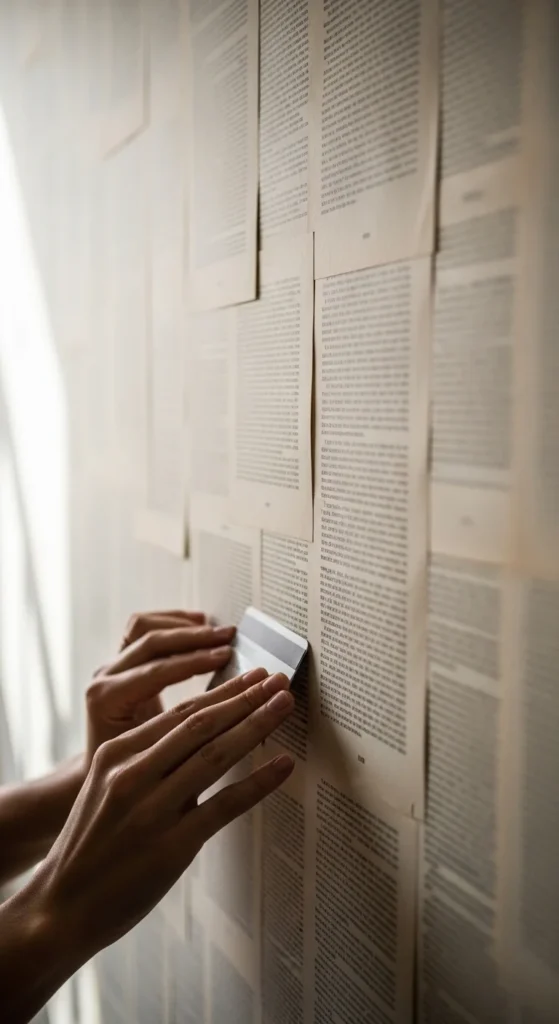
This is the big-impact option that still stays low-cost. Start with one accent wall so you don’t feel overwhelmed. Gather pages from old novels, dictionaries, or sheet music for variation in texture. Lay pages out on the floor first to plan your direction.
Work in rows. Overlap each page slightly, like shingles on a roof. That overlap hides uneven edges and feels intentional. Use a thin layer of adhesive, then press each page flat. Smooth air bubbles with a plastic card. Move slowly and wipe off excess glue as you go.
If you rent, build the “wallpaper” on large poster boards or hardboard panels instead. Then hang the panels with strong removable strips. You get the look without permanent commitment.
Finish by lightly distressing random corners for a lived-in feel. Step back often to check spacing. The wall will look more natural when the pages aren’t perfectly aligned.
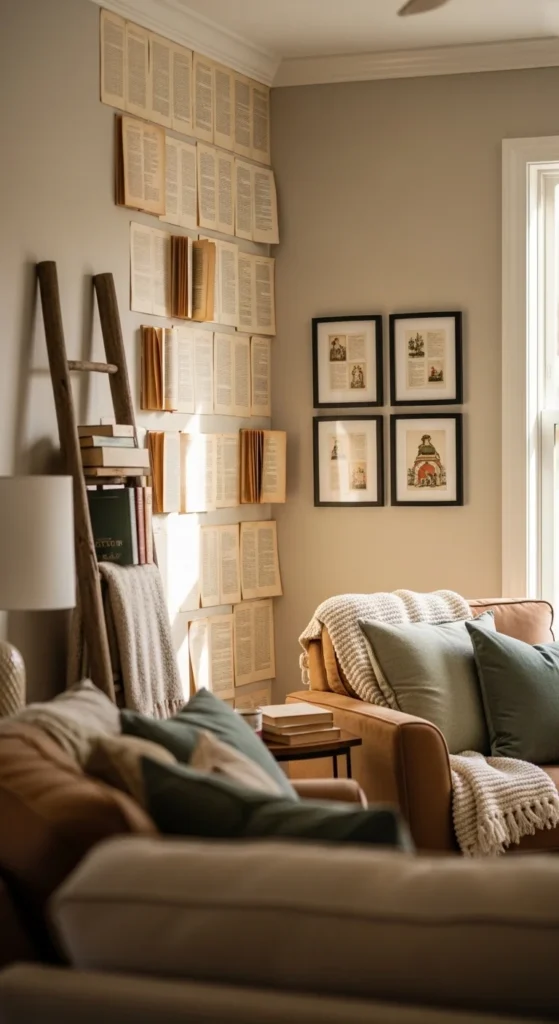
2. Hardboard Book Page Wall Panels
Panels give you a clean, modular way to cover a wall. Cut hardboard into manageable sections. Then cover each section with book pages using adhesive. Overlap the pages slightly so seams disappear.
Panels are great for textured walls where paper won’t stick well. They also let you work at a table instead of on the wall. Once dry, hang the panels with picture hooks, small nails, or heavy-duty removable strips.
If you want a calmer look, choose one book style, like dictionaries only. For a layered look, mix novels with sheet music. Keep a small stack of “nice pages” for spots that will sit near eye level.
A budget-friendly trick is to use thin plywood scraps from a hardware store. Ask the cutting counter to cut pieces for you. When you’re done, the panels can move to a new room or new home.
3. Renter-Friendly Tape Grid Gallery
This idea is simple and renter-safe. Choose 12–20 pages with similar tones. Tear the edges for a soft vintage look, or keep edges crisp for a cleaner style. Arrange the pages on the floor first in a grid pattern.
Use removable double-sided strips or painter-friendly mounting tabs on the corners. Press each page gently so the paper doesn’t wrinkle. Keep spacing consistent by using a ruler or even a spare book as a spacer.
To add personality, mix in a few pages from a dictionary or an old atlas. Keep the mix light so it still feels cohesive. You can also rotate pages slightly for a more casual look.
This display works well above a desk, reading nook, or entry table. If you get bored, swap pages out seasonally. It’s like changing wallpaper without the long commitment or the mess.
4. Furniture Nail Pin-Up Wall
If you like an eclectic look, pin pages loosely instead of gluing them down. Use small decorative nails or panel pins. Space them evenly, or scatter them for a casual style.
Pick pages with interesting typography. Dictionaries and older novels look great. Mix in a few pages at different heights so the wall feels lived-in.
This approach avoids wrinkles and makes replacement easy. If one page tears, pull it down and swap it. You can also layer pages, pinning one on top of another like a collage.
Keep nails minimal. One or two per page is enough. Too many nails can look busy. If you rent and want fewer holes, pin only the top row and let pages overlap downward like a curtain.
5. Framed Single Page “Print” Wall
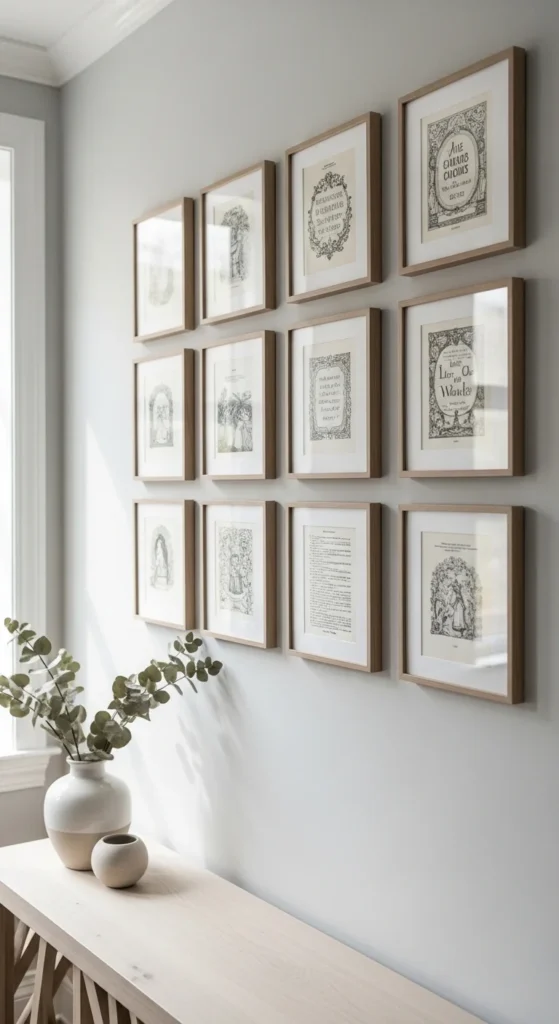
Framing a single page is the quickest route to a polished look. Choose pages with warm tone and clean margins. If the text is too dark, pick a lighter page so it doesn’t compete with your design.
You can leave the page plain, or add a simple design on top. Botanical outlines, small ink sketches, and soft watercolor shapes work well. Keep details minimal so the text still reads as texture in the background.
Thrift stores are perfect for frames. Mix sizes for a gallery wall, or keep the frames all the same for a clean grid. If frames don’t match, paint them one neutral color.
Mount the page on cardstock before framing to prevent rippling. Use photo corners if you don’t want glue on the paper. This idea looks great in hallways and bedrooms.
6. Botanical Book Page Prints
Botanical prints are a favorite because they look timeless. Find simple floral images, leaves, or ferns. Print them lightly so the book text still shows through. That layered look is the whole charm.
Thin pages can jam in printers, so feed one page at a time. If you’re nervous, attach the book page to a sheet of plain paper with removable tape along the top edge, then run it through as one unit.
Let ink dry fully. Mount the page on heavier paper for support, then frame it. A thin wood frame gives warmth, while black feels modern.
If printing isn’t your thing, trace a leaf with a stencil and paint lightly with watercolor. Keep color soft so the page still feels vintage.
7. Stenciled Color Pop Pages
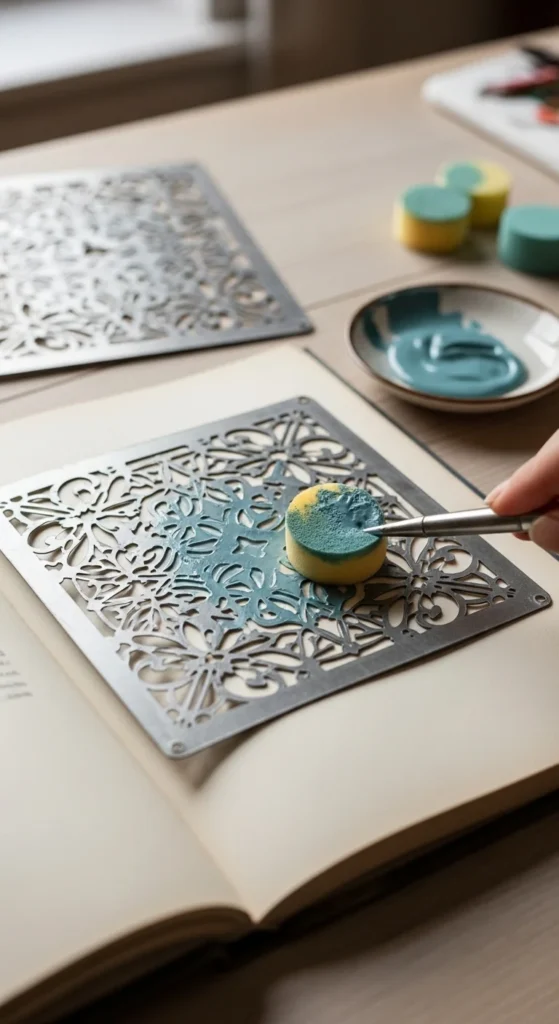
Stenciling gives you a clean design even if you’re not confident drawing. Choose a simple stencil with bold shapes. Florals and geometric designs work well.
Tape the page to a board so it doesn’t shift. Tape the stencil on top. Use a sponge with a small amount of paint and dab lightly. Heavy paint can seep under and blur edges.
Make a set of 3–6 pages in one theme. Frame them or hang them with clips. Groups feel more intentional than singles.
Keep your palette limited. Two colors plus black is plenty. Let each layer dry before adding another to avoid smearing and warping.
8. Watercolor Botanical Overlays
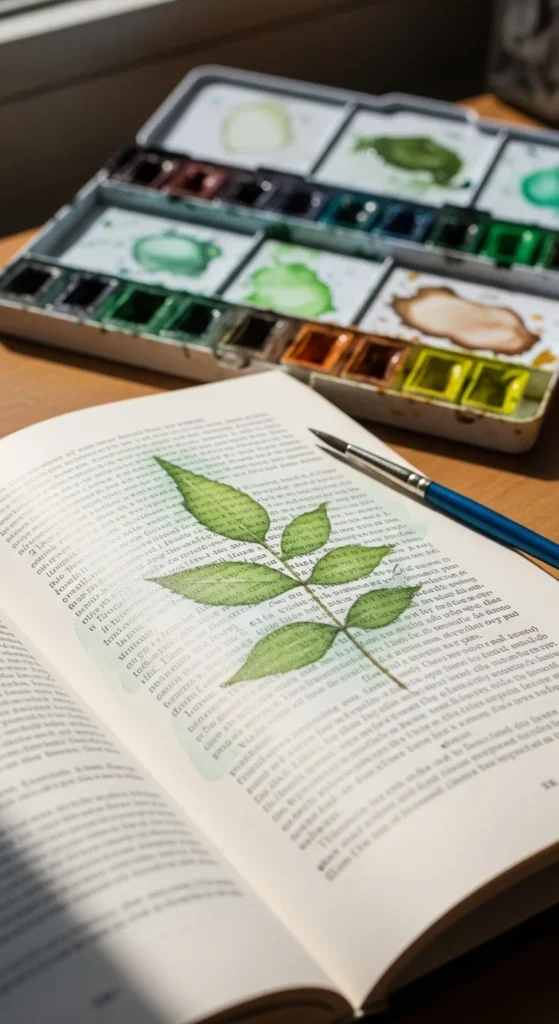
Watercolor on book pages feels delicate and artsy. Choose thicker pages when possible. Tape corners down to reduce warping. Use diluted paint and build color slowly.
Paint a branch, a few leaves, or a simple flower. Leave plenty of text visible. That contrast between print and paint is what makes it feel special.
When dry, flatten under a heavy book with plain paper on top. Then mount on cardstock and frame.
A budget trick is watercolor pencils. You can draw lightly, then activate with a wet brush. It uses less water and keeps pages flatter.
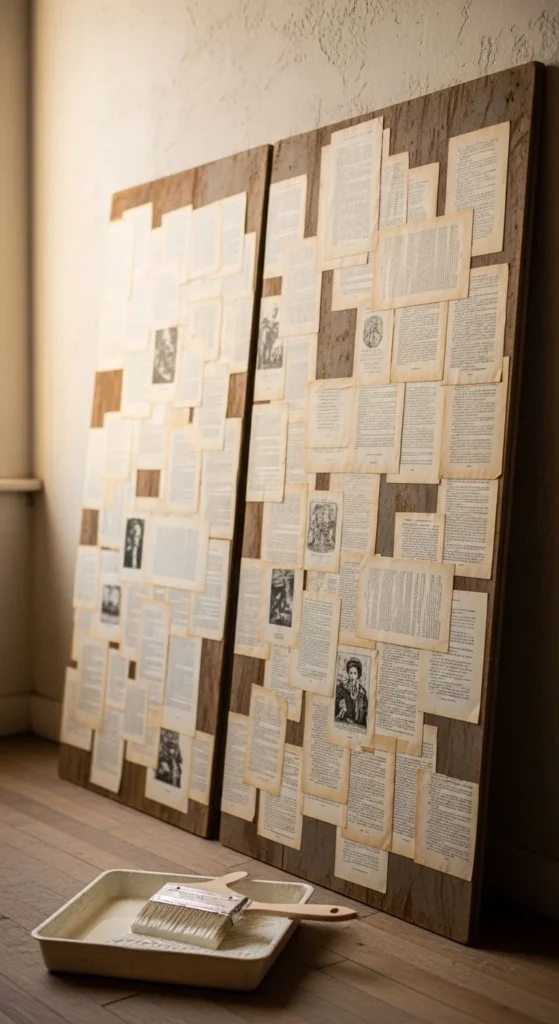
9. Distressed Wood Backed Art Boards
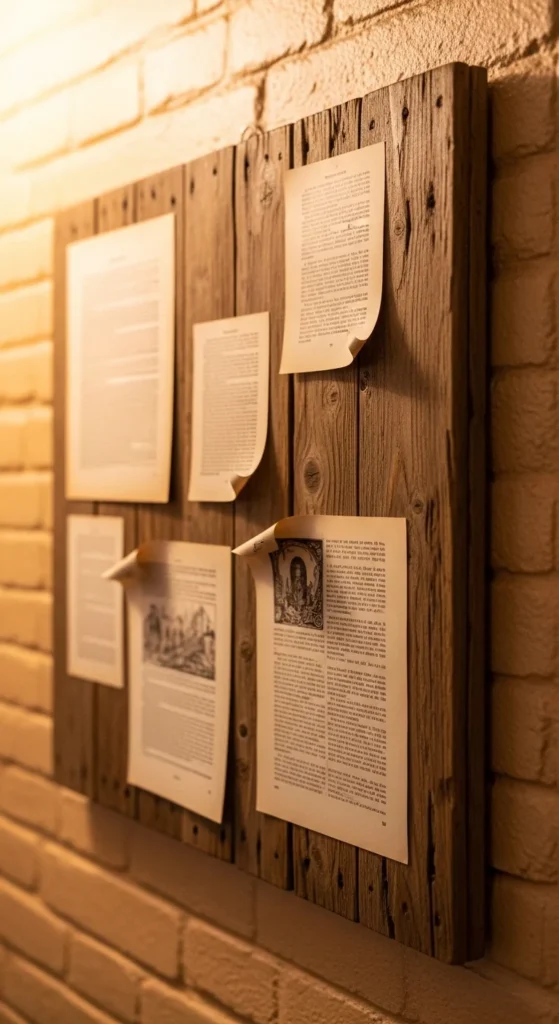
Mounting pages on wood adds structure and rustic charm. Sand the board lightly. Apply pages in a collage style, overlapping edges, and smooth with a plastic card.
Once dry, distress edges with sandpaper so a little wood shows. That worn edge makes the piece feel aged without being messy.
Leave it plain or add a simple stenciled shape on top. Hang it with a sawtooth hanger, or lean it on a shelf.
Use scrap wood from old shelves or packaging to keep costs low. Imperfections in the board often make the finished piece look better.
10. Book Page “Window Frame” Grid
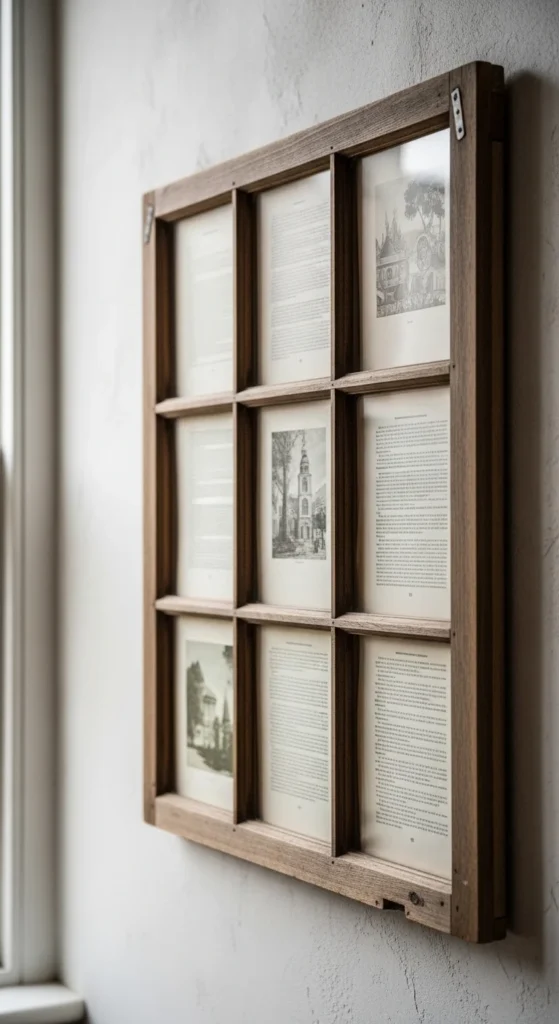
Old window frames make instant wall art. Each pane becomes a mini frame for book pages. Clean the frame, then paint it if you want.
Cut pages to fit each pane. If there’s glass, place pages behind it for a tidy look. If there’s no glass, attach pages with double-sided tape.
Alternate page types for interest, like dictionary pages in the top row and novels below. Hang it as one statement piece above a console or sofa.
Flea markets are great for window frames with broken glass. Remove the glass and still use the frame.
11. Cricut-Cut Leaf Garland Wall Swag

Cut leaf shapes and string them on twine for easy wall decor. Curl leaves slightly with your fingers for depth. Mix in sheet music leaves for subtle contrast.
Hang across a mantel, shelf, or mirror. Keep spacing consistent so it looks tidy.
No machine? Use a simple leaf template and cut by hand. Slightly uneven edges still look charming on old pages.
Garlands are great for using leftovers. It’s one of the easiest ways to stretch one book into multiple decor pieces.
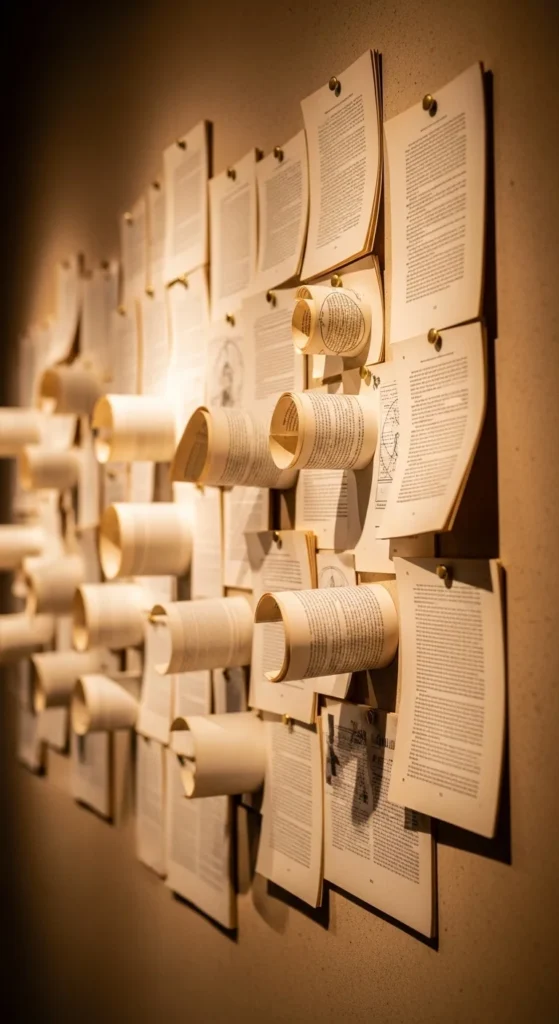
12. 3D Folded Heart Wall Board
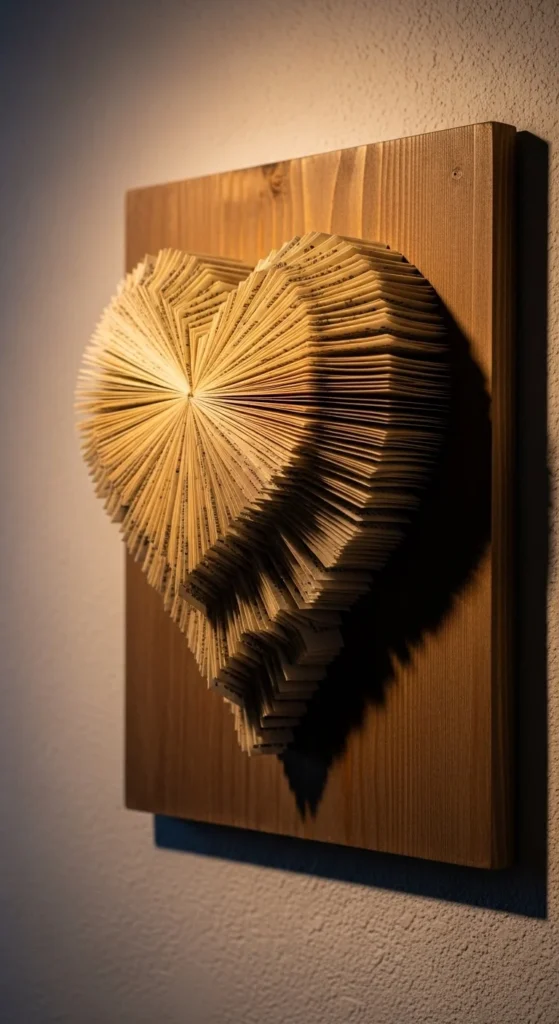
Cut a heart from foam board or cardboard. Fold small book page sections into triangles or rosettes and glue them down with hot glue. Work from the edge inward so seams stay hidden.
Add a ribbon or twine hanger. Lace looks pretty if you want a softer style.
This looks great in bedrooms, weddings, or reading corners. Lightly ink edges for an aged look.
Use thrifted books with wide margins. They fold more cleanly and create a smoother surface texture.
13. Book Page Rosette Shadow Box
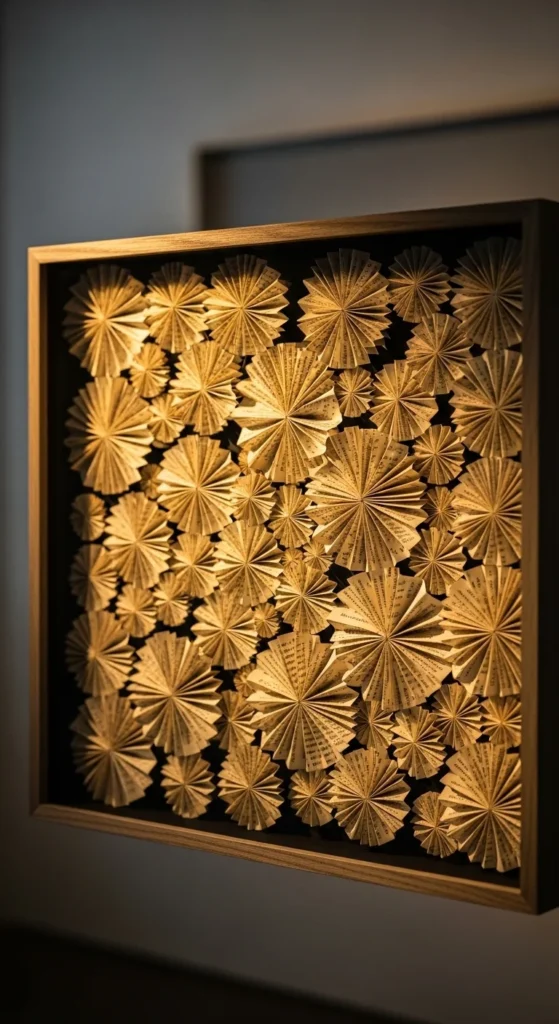
Make rosettes by folding strips into accordion pleats, then gluing into circles. Arrange them inside a shadow box. Vary sizes so the layout feels layered.
Use foam tape behind some rosettes to create depth. That shadow makes the piece look more like sculpture.
This project uses scraps well. Even smaller page pieces can become rosettes.
Thrifted shadow boxes keep the cost low. If the frame is shiny, paint it matte so the paper texture stands out.
14. Sheet Music Wall Art for Music Rooms
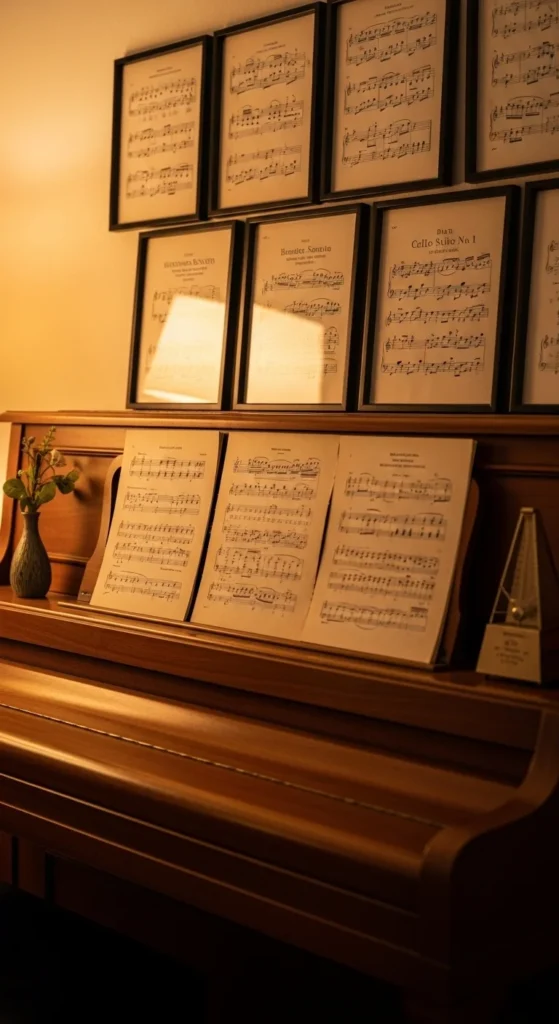
Frame sheet music pages in a row or grid. The notes add visual rhythm and feel classic. Use frames that match so the wall stays calm.
Tear edges for a rustic look, or cut clean for modern style. Layer a torn book page behind sheet music for subtle contrast.
This looks great above a piano, desk, or console. It also works in nurseries if you like vintage decor.
Dollar-store frames look better when painted one neutral color. That simple step makes the display feel more intentional.
15. French Dictionary “Parisian” Collage

French dictionary pages feel romantic and travel-inspired. Layer pages with slight overlap and a few torn edges. Mount on a backing and frame.
Add a faint line drawing on top if you want a focal point, like a small botanical outline. Keep it light so the print still shows.
This looks great in bedrooms and hallways. Pair it with warm metals and neutral textiles.
No French book? Any bilingual dictionary gives the same look because mixed language lines create visual interest.
16. Mod Podge Smooth-Mount “No Bubbles” Art
If pages wrinkle, switch to a smoother method. Work on a board. Apply a thin coat of adhesive, place the page, then smooth from center outward with a plastic card.
Do small sections at a time so glue doesn’t dry before you smooth it. Wipe excess around edges.
Seal the top with a thin coat after everything dries. A light seal helps edges stay down.
Turn it into a large panel you can hang like a painting. It gives the wallpaper look without gluing anything to the wall.
17. Tin Can Page Wrap Wall Sconces
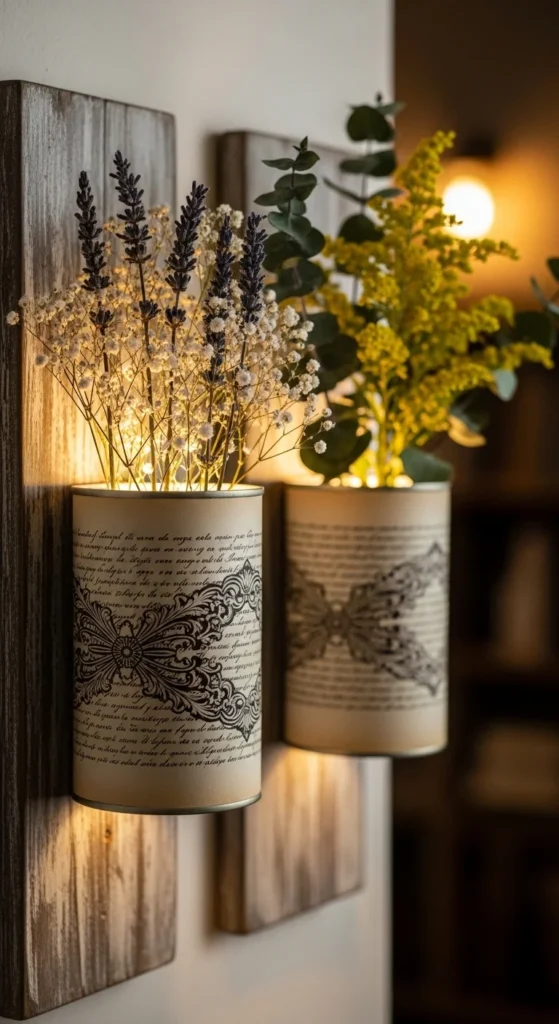
Wrap cleaned tin cans with book pages and glue. Distress edges lightly. Mount cans onto a wooden board, then hang the board.
Use the cans as holders for dried flowers, faux greenery, or rolled paper flowers. The mixed materials add depth without extra cost.
Sand the wood edges for a rustic look. Paint the board neutral if you prefer a cleaner style.
This works well in kitchens, craft rooms, and entryways. Use pantry cans and scrap wood to keep it budget-friendly.
18. Book Page “Quilt” Patchwork Frame
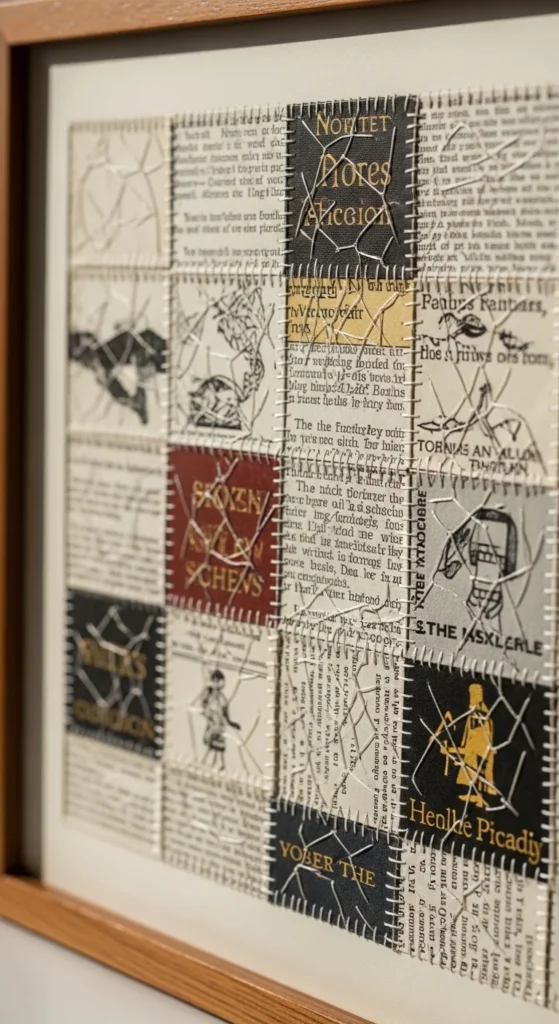
Cut small squares from novels, dictionaries, and sheet music. Arrange them like a quilt on a backing board. Keep lines straight for a tidy look.
Glue down and frame. The patchwork reads as texture from afar and becomes interesting up close.
This is relaxing to make and great for using mixed paper types. It also fits many decor styles because the palette stays neutral.
Use a cheap poster frame if you want a large piece without a big cost.
19. Minimal Clip Rail Page Display
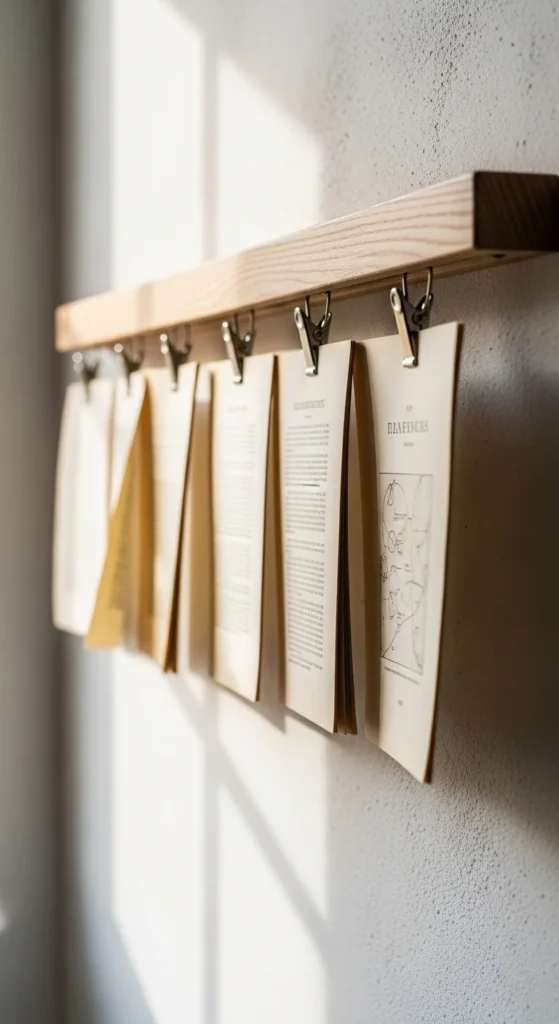
A clip rail lets you display pages like rotating art. Use a thin wooden strip with small clips. Hang it level, then clip pages along it.
Swap pages by season. Add sheet music or dictionary pages for variety. Mix in one postcard or small photo if you want.
This keeps costs low because you don’t need frames. It’s also renter-friendly with removable strips or one small nail.
DIY option: a wood strip, clothespins, and twine still looks neat if you keep spacing consistent.
20. Book Page “Mat Board” Layered Frames
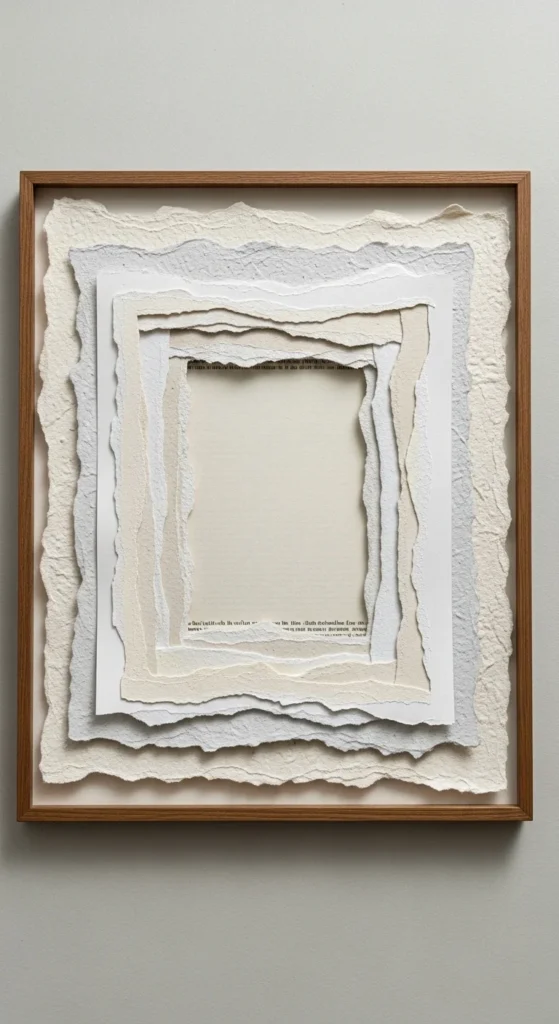
Create a faux mat using paper layers. Place a centered book page on a backing sheet, then add a torn border layer behind it. Kraft paper or cardstock works well.
Torn edges make it feel handmade. Keep the center page simple so the mat effect doesn’t compete.
Frame the whole piece. The layered border adds depth and makes the page feel more like art.
You can reuse the cardboard backing that comes in frames. Wrap it in paper and you have a free mat.
21. Page-Edge Torn Fringe Wall Hanging
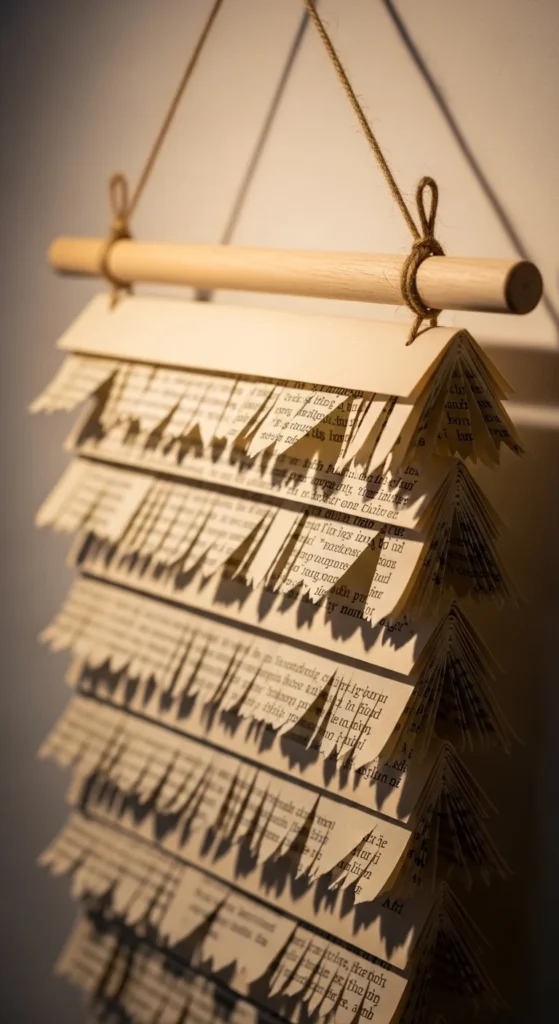
Cut pages into long strips and tear bottoms into fringe. Layer strips and glue onto a backing. Attach the top to a wooden dowel with twine.
Mix in a few sheet music strips for contrast. Keep tones neutral so it feels calm. Slightly uneven fringe adds texture.
This is lightweight and easy to hang with one hook. It’s great for boho spaces and reading corners.
Use a fallen branch as the dowel for a natural, free finishing touch.
22. Chalk-Painted Frame with Book Page Insert

Paint a thrifted frame with chalk-style paint, then sand edges lightly for a worn look. Insert a plain book page or a lightly stenciled page.
Make three frames for a small gallery wall. Painting mismatched frames the same color makes the set look cohesive.
This is a quick project with a big visual payoff. It also works well for gifts.
Keep the page simple so the frame texture stays the highlight.
23. Book Page Background for Photo Frames
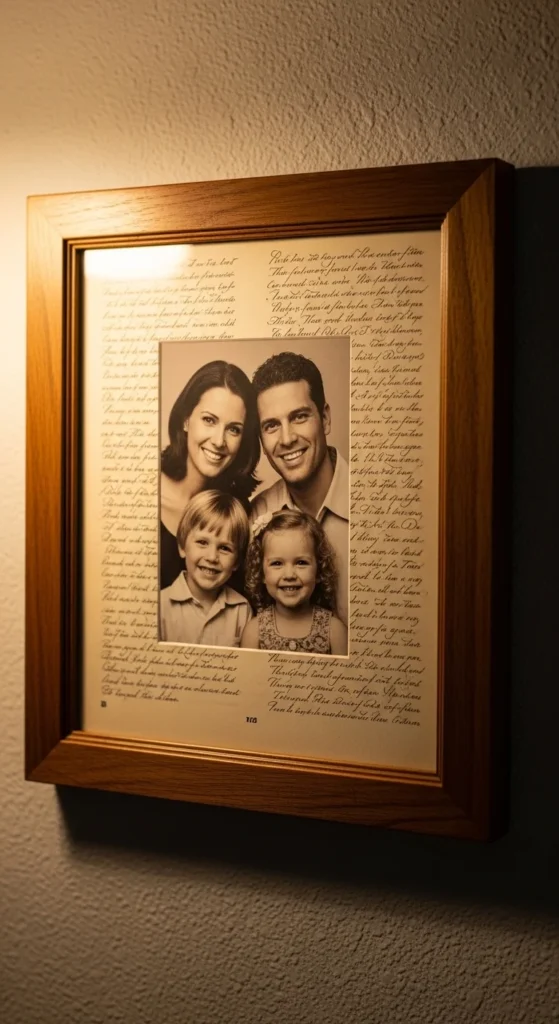
Use book pages as mats behind photos. Pick pages with lighter text density so the photo stays the focus. Cut the page slightly larger than the photo, mount the photo on top, and frame it.
This looks especially good with black-and-white photos because the typography becomes texture. You can also use sheet music behind concert or wedding photos for a personal tie-in.
Create a gallery wall where every photo has a different page background. It stays cohesive while still varied.
Budget tip: thrift frames plus home-printed photos keep the cost low, while the book page mat makes everything look more intentional.
Conclusion
Book page wall art gives your home a cozy, literary feel without spending much. Start small with a clip rail, framed pages, or a renter-friendly tape grid. If you want a bigger statement, try panels or an overlap feature wall that hangs like a painting. Work in sections, smooth carefully, and keep spacing consistent. With a few thrifted books and basic supplies, you can create wall decor that feels personal and lasting.

DiyVisual is a DIY ideas resource for makers of every level. Our small editorial team researches and curates easy, budget-friendly craft, home decor, and handmade gift projects — explained step by step so anyone can recreate them at home with simple materials.


